Laravel初心者向けチュートリアルのTODOアプリ③タスクの編集と削除

2724 回閲覧されました
みなさんこんにちは、jonioです。
今回はタスクの編集と削除の解説です。
今回で解説は最後ですが1回目の記事をまだ読んでない方は↓から記事を読む事ができます。
目次
- 1 タスクが空の状態で登録できないようにする
- 2 TasksRequest.phpの編集
- 3 add.blade.php
- 4 入力した内容がフォームに残った状態にする
- 5 タスクのタイトルの並び順の変更
- 6 タスクを編集するページへ移動(ルーティングの設定)
- 7 タスクを編集するページへ移動(コントローラーの設定)
- 8 タスクを編集するページへ移動(edit.blade.php)
- 9 index.blade.phpとdetail.blade.php
- 10 タスクを編集(ルーティングの設定)
- 11 タスクを編集(コントローラーの設定)
- 12 タスクを編集(edit.blade.phpの編集)
- 13 タスクの削除
- 14 index.blade.phpとdetail.blade.php
- 15 タスクの削除(ルーティングの設定)
- 16 タスクの削除(コントローラーの設定)
タスクが空の状態で登録できないようにする
今の状態でタスクを登録するとエラーになります。

そうならない様にタスクが空っぽで登録した場合にタスクを追加するページに警告文を表示させます。
その為にフォームリクエストを使います。
フォームリクエスト
入力した時に文字が入ってなかったり文字数が多すぎる場合に警告文を表示させますがそれをバリデーションと言いバリデーションチェックをフォームリクエストで行います。
コマンドは「php artisan make:request 名称Request」です。
今は名称を「Tasks」とします。
ターミナルで↓のコマンドを入力します。
php artisan make:request TasksRequestすると「プロジェクト名 > app > Http > Requests > TasksRequest.php」ができます。
それではTasksRequestを編集します。
TasksRequest.phpの編集
TasksRequest.phpを編集します。
<?php

namespace App\Http\Requests;

use Illuminate\Foundation\Http\FormRequest;

class TaskRequest extends FormRequest
{
    /**
     * Determine if the user is authorized to make this request.
     *
     * @return bool
     */
    public function authorize()
    {
        return true;                                  //この行を編集
    }

    /**
     * Get the validation rules that apply to the request.
     *
     * @return array
     */
    public function rules()
    {
        return [
            //
        ];
    }
}
view raw
16行目の「false」を「true」に変えないとフォームリクエストが使えないので変えます。
そしてコードを追加しますがバリデーションの内容は以下になります。
- タスクのタイトルと内容の入力は必須
- タイトルは30文字以内
<?php

namespace App\Http\Requests;

use Illuminate\Foundation\Http\FormRequest;

class TaskRequest extends FormRequest
{
    /**
     * Determine if the user is authorized to make this request.
     *
     * @return bool
     */
    public function authorize()
    {
        return true;
    }

    /**
     * Get the validation rules that apply to the request.
     *
     * @return array
     */
    public function rules()
    {
        return [


            //ここから追加
            'name' => 'required|max:30',
            'content' => 'required',
            //ここまで追加


        ];
    }
}
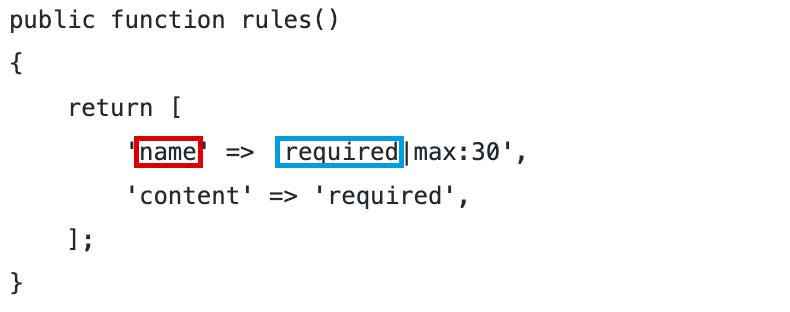
24行目のrulesメソッドはバリデーションのルールを定義するメソッドで連想配列の形で書きます。
30行目の「name」と31行目の「content」はテーブルのカラム名(↓の赤枠)です。

30行目の「required|max:30」の「required」は必須という意味で「max:30」は「使うことができる最大の文字数」という意味です。
エラーメッセージの設定
バリデーションを満たしていない時に表示するエラーメッセージの設定をします。
TasksRequest.phpを編集します。
<?php

namespace App\Http\Requests;

use Illuminate\Foundation\Http\FormRequest;

class TaskRequest extends FormRequest
{
    /**
     * Determine if the user is authorized to make this request.
     *
     * @return bool
     */
    public function authorize()
    {
        return true;
    }

    /**
     * Get the validation rules that apply to the request.
     *
     * @return array
     */
    public function rules()
    {
        return [
            'name' => 'required|max:30',
            'content' => 'required',
        ];
    }


    //ここから追加
    public function messages()
    {
        return [
            'name.required' => 'タスクは必須です',
            'name.max' => 'タスクは30文字以内で入力してください',
            'content.required' => 'タスク内容は必須です',
        ];
    }
    //ここまで追加
}
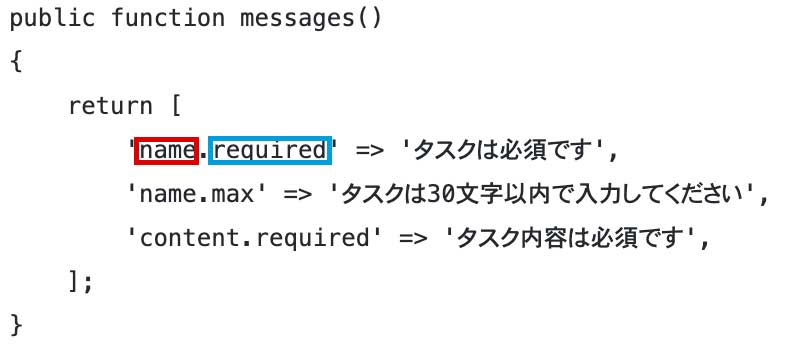
34行目のmessagesメソッドはエラーメッセージを定義するメソッドで連想配列の形で書きます。
rulesメソッドの連想配列を使って「赤枠.青枠」の形で書きます。
設定したリクエストフォームをTasksController.phpに適応します。
<?php

namespace App\Http\Controllers;

use Illuminate\Http\Request;
use App\Models\Task;
use App\Http\Requests\TaskRequest;                           //この行を追加

class TasksController extends Controller
{
    public function index()
    {
        $tasks = Task::get();
        return view('tasks.index', compact('tasks'));
    }

    public function show($id)
    {
        $task = Task::find($id);
        return view('tasks.detail', compact('task'));
    }

    public function add()
    {
        return view('tasks.add');
    }

    public function store(TaskRequest $request)
    {
        $result = Task::create([
            'name' => $request->name,
            'content' => $request->content
        ]);

        return redirect()->route('tasks.index');
    }
}
7行目でリクエストフォームを使えるようにしています。
バリデーションも含んだフォームの内容を受ける事ができるようにする為に28行目の「(Request $request)」が「(TaskRequest $request)」に変更になっています。
これでフォームに値を入力してバリデーションに通ったらコントローラーが動きます。
それではタスクを登録するページにバリデーションにひっかかった場合のエラーメッセージが表示されるようにします。
add.blade.php
add.blade.phpのコードを↓にします。
<style>
    h1 {
        text-align: center;
        padding: 30px;
    }
    .form {
        width: 80%;
        margin: 0 auto;
        text-align: center;
    }
    .form-group {
        padding-bottom: 50px;
    }
    span {
        color: red;
    }
    input {
        width: 60%;
        height: 30px;
    }
    textarea {
        width: 60%;
    }
    .error {
        text-align: center;
    }


    //ここから追加
    .error__message {
        color: red;
    }
    //ここまで追加


</style>
<h1>タスク追加</h1>


//ここから追加
<div class="error">
    @foreach ($errors->all() as $error)
      <p class="error__message">{{$error}}</p>
    @endforeach
</div>
//ここまで追加


<form action="{{route('tasks.store')}}" method="POST" class="form">
@csrf
    <div class="form-group">
        <label for="name">タスク<span>(必須)</span></label><br>
        <input type="text" name="name" maxlength="30" placeholder="タスクは30文字で書きましょう。">
    </div>
    <div class="form-group">
        <label for="content">タスク内容<span>(必須)</span></label><br>
        <textarea rows="5" name="content" placeholder="タスク内容を具体的に書きましょう"></textarea>
    </div>
    <button type="submit">追加する</button>
</form>
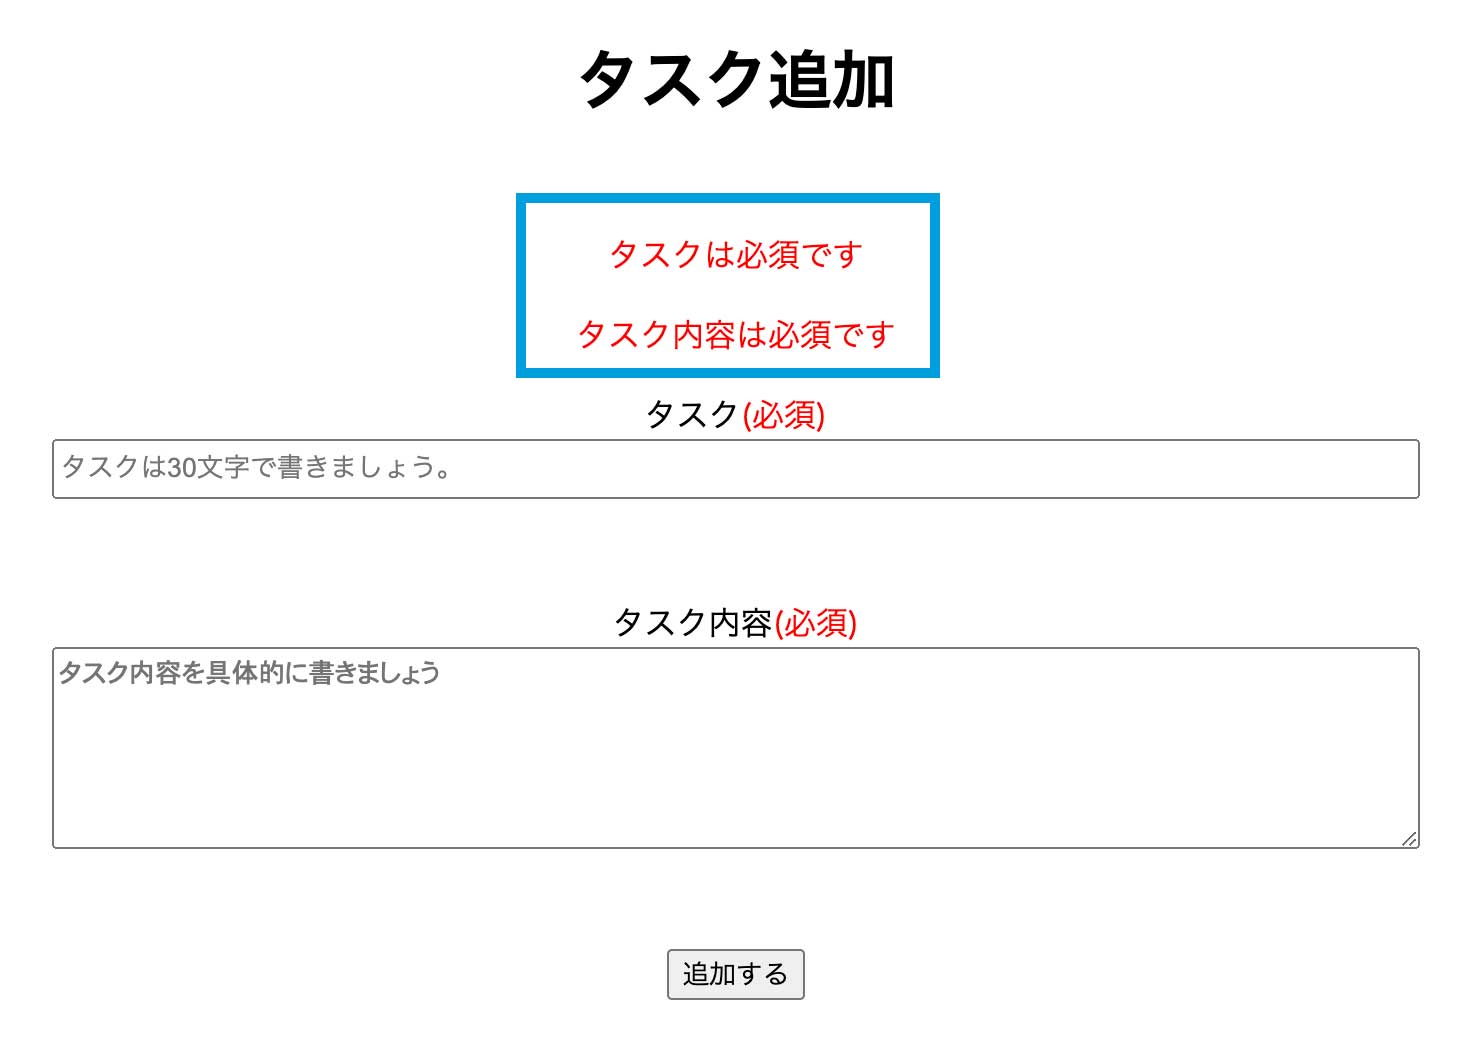
42行目〜44行目でエラーメッセージが表示されるようになります。
この書き方でエラーメッセージが表示されると覚えていいです。
タスクを入力するページでわざと何も入力していない状態で登録しようとすると↓の表示になり登録ができなくなります。
入力した内容がフォームに残った状態にする
バリデーションに引っかかった今のフォームの状態ですがフォームに入力した内容が残りません。
タスクのタイトルがない状態でタスクを追加します。
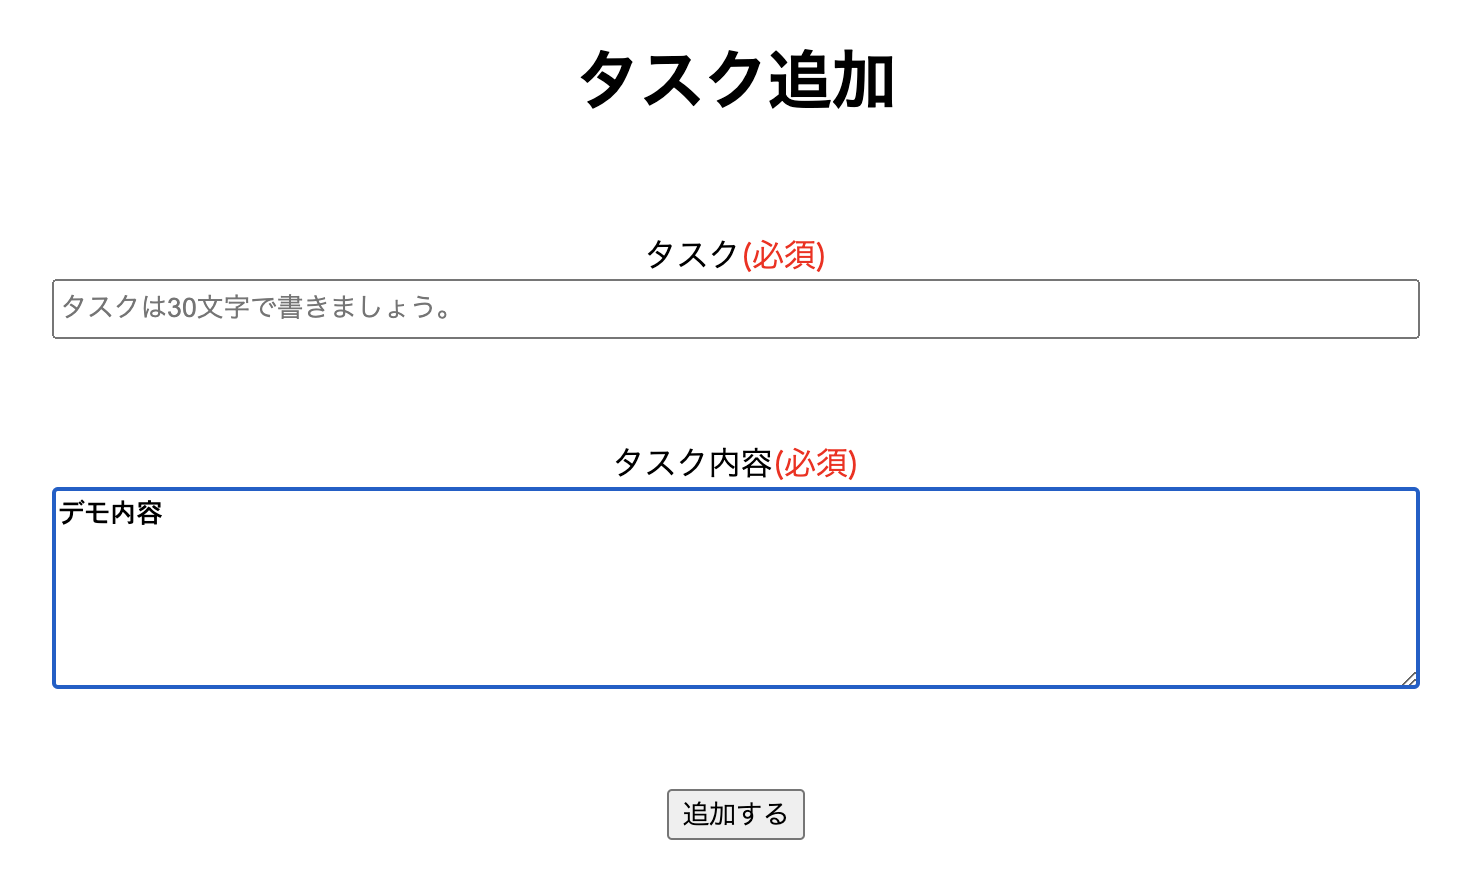
するとタスクの内容が消えます。
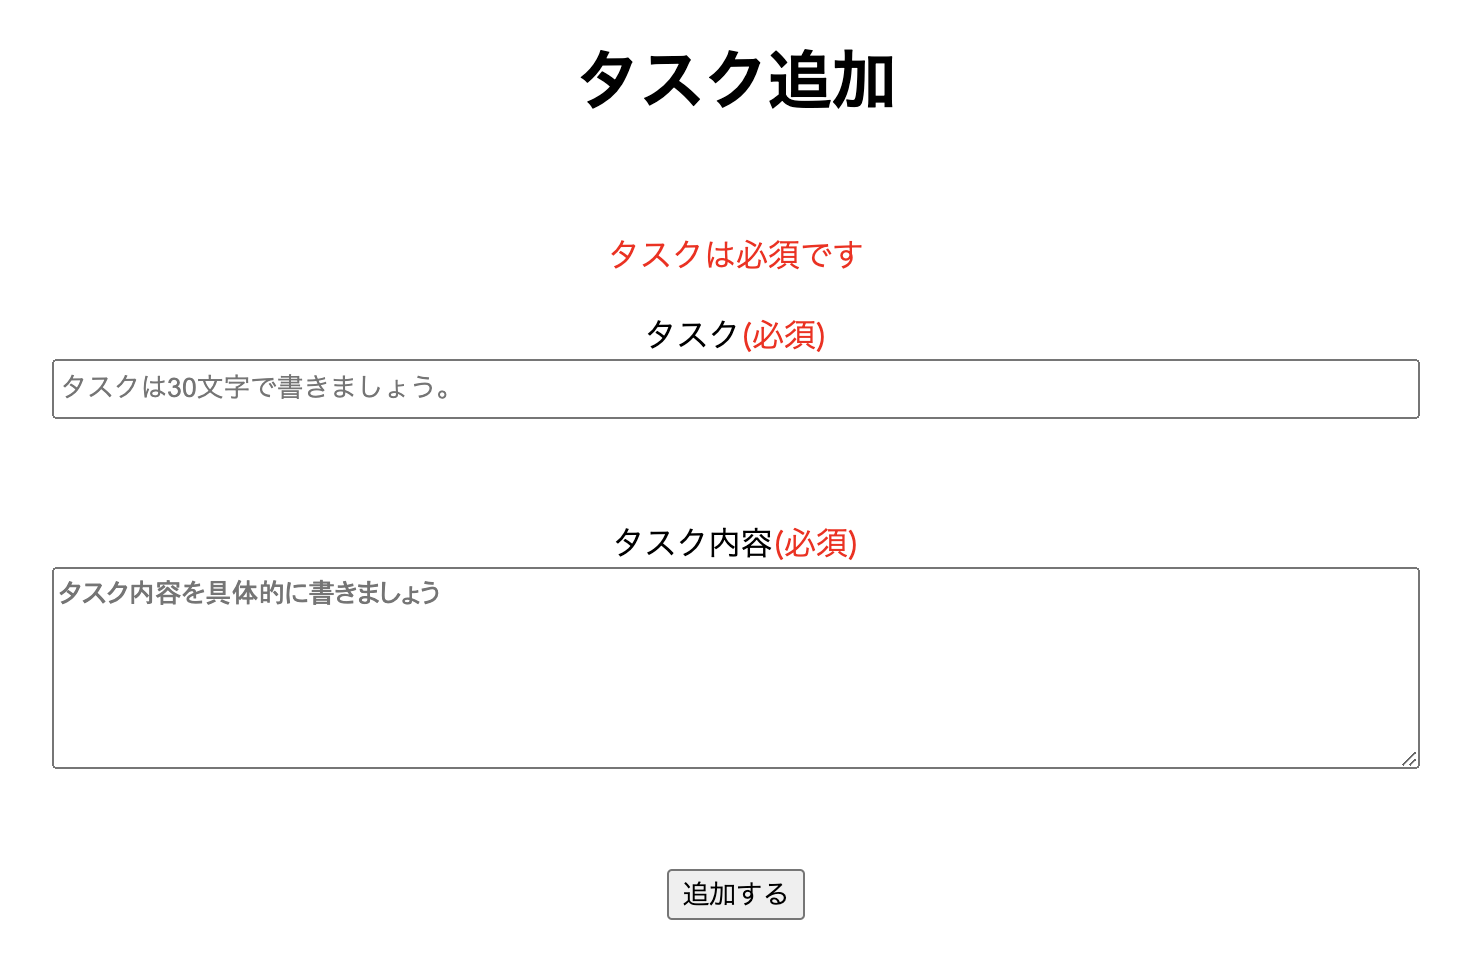
バリデーションに引っかかった場合もフォームに入力した内容が残る様にします。
add.blade.phpを↓にします。
<style>
    h1 {
        text-align: center;
        padding: 30px;
    }
    .form {
        width: 80%;
        margin: 0 auto;
        text-align: center;
    }
    .form-group {
        padding-bottom: 50px;
    }
    span {
        color: red;
    }
    input {
        width: 60%;
        height: 30px;
    }
    textarea {
        width: 60%;
    }
    .error {
        text-align: center;
    }
    .error__message {
        color: red;
    }
</style>
<h1>タスク追加</h1>
<div class="error">
    @foreach ($errors->all() as $error)
      <p class="error__message">{{$error}}</p>
    @endforeach
</div>
<form action="{{route('tasks.store')}}" method="POST" class="form">
@csrf
    <div class="form-group">
        <label for="name">タスク<span>(必須)</span></label><br>
        <input type="text" name="name" maxlength="30" placeholder="タスクは30文字で書きましょう。" value="{{ old('name') }}">                    //この行を編集
    </div>
    <div class="form-group">
        <label for="content">タスク内容<span>(必須)</span></label><br>
        <textarea rows="5" name="content" placeholder="タスク内容を具体的に書きましょう">{{ old('content') }}</textarea>                         //この行を編集
    </div>
    <button type="submit">追加する</button>
</form>
41行目に「value=”{{ old(‘name’) }}”」・45行目に「{{ old(‘content’) }}」を追加していますが「{{old(‘name属性名’)}}」でフォームに入力した値を残す事ができます。
属性名は↓の赤枠と青枠を見てください、name=”〜”の〜です。

次はタスクのタイトルの並び順を変えます。
タスクのタイトルの並び順の変更
タスクを表示するページ(index.blade.php)を見るとタスクが古い順に並んでいます。

↑は「デモタイトル」を後で追加しています。
タスクは上から新しい順に並んだ方が自然なので並び順を変えます。
コントローラーのindexアクションでタスクを取得していますがそこの記述を修正します。
<?php

namespace App\Http\Controllers;

use Illuminate\Http\Request;
use App\Models\Task;
use App\Http\Requests\TasksRequest;

class TasksController extends Controller
{
    public function index()
    {
        $tasks = Task::orderBy('updated_at', 'desc')->get();             //この行を修正
        return view('tasks.index', compact('tasks'));
    }

    public function show($id)
    {
        $task = Task::find($id);
        return view('tasks.detail', compact('task'));
    }

    public function add()
    {
        return view('tasks.add');
    }

    public function store(TasksRequest $request)
    {
        $result = Task::create([
            'name' => $request->name,
            'content' => $request->content
        ]);

        return redirect()->route('tasks.index');
    }
}13行目の「Task::get()」を「Task::orderBy(‘updated_at’, ‘desc’)->get()」に変更しました。
「get()」に当たるのが「->get()」です。
orderBy(‘テーブルのカラム名’,desc)で新しい順に並べますが日付で並び順を変えるのでカラムに「updated_at」を使っています。
descを使うと新しい順に並べる事ができてascを使うと古い順に並べる事ができます。
これでタスクの並び順を変える事ができました。

次はタスクを編集できるようにします。
タスクを編集できるページをtasksフォルダの下に作成しますが「edit.blade.php」とします、すぐに編集するので中身は適当に何かを書いてください。
作業の流れは「ルーティング→コントローラー→ビュー」なのでまずはルーティングの設定をします。
タスクを編集するページへ移動(ルーティングの設定)
web.phpのコードを↓にします。
<?php

use Illuminate\Support\Facades\Route;
use App\Http\Controllers\TasksController;

/*
|--------------------------------------------------------------------------
| Web Routes
|--------------------------------------------------------------------------
|
| Here is where you can register web routes for your application. These
| routes are loaded by the RouteServiceProvider within a group which
| contains the "web" middleware group. Now create something great!
|
*/

Route::get('/', [TasksController::class, 'index'])->name('tasks.index');

// 詳細ページ
Route::get('/{id}', [TasksController::class, 'show'])->name('tasks.show');

// タスク追加
Route::get('/tasks/add', [TasksController::class, 'add'])->name('tasks.add');

// 追加したタスクをデータベースに追加
Route::post('/tasks/add', [TasksController::class, 'store'])->name('tasks.store');

//タスクの編集
Route::get('/tasks/edit/{id}', [TasksController::class, 'edit'])->name('tasks.edit');                 //この行を追加
29行目を追加していますが「/tasks/edit/{id}」が「/tasks/{id}」や「/edit/{id}」にならない理由は分かりますか?
前に同じ考え方が出てきていますが「/tasks/{id}」や「/edit/{id}」にすると26行目のstoreアクションが作動するからです。
次はコントローラーの設定をします。
タスクを編集するページへ移動(コントローラーの設定)
TasksController.phpのコードを↓にします。
<?php

namespace App\Http\Controllers;

use Illuminate\Http\Request;
use App\Models\Task;
use App\Http\Requests\TasksRequest;

class TasksController extends Controller
{
    public function index()
    {
        $tasks = Task::orderBy('updated_at', 'desc')->get();
        return view('tasks.index', compact('tasks'));
    }

    public function show($id)
    {
        $task = Task::find($id);
        return view('tasks.detail', compact('task'));
    }

    public function add()
    {
        return view('tasks.add');
    }

    public function store(TasksRequest $request)
    {
        $result = Task::create([
            'name' => $request->name,
            'content' => $request->content
        ]);

        return redirect()->route('tasks.index');
    }


    //ここから追加
    public function edit($id)
    {
        $task = Task::find($id);
        return view('tasks.edit', compact('task'));
    }
    //ここまで追加


}
次はビューの設定です。
タスクを編集するページへ移動(edit.blade.php)
edit.blade.phpのコードを↓にします。
<style>
    h1 {
        text-align: center;
        padding: 30px;
    }
    .error {
        text-align: center;
    }
    .error__message {
        color: red;
    }
    .form {
        width: 80%;
        margin: 0 auto;
        text-align: center;
    }
    .form-group {
        padding-bottom: 50px;
    }
    span {
        color: red;
    }
    input {
        width: 60%;
        height: 30px;
    }
    textarea {
        width: 60%;
    }
</style>
<h1>タスク編集</h1>
<div class="error">
    @foreach ($errors->all() as $error)
      <p class="error__message">{{$error}}</p>
    @endforeach
</div>
<form action="" method="POST" class="form">
@csrf
    <div class="form-group">
        <label for="name">タスク<span>(必須)</span></label><br>
        <input type="text" name="name" maxlength="30" placeholder="タスクは30文字で書きましょう。" value="{{ old('name', $task->name) }}">
    </div>
    <div class="form-group">
        <label for="content">タスク内容<span>(必須)</span></label><br>
        <textarea rows="5" name="content" placeholder="タスク内容を具体的に書きましょう">{{ old('content', $task->content) }}</textarea>
    </div>
    <button type="submit">更新する</button>
</form>
タスクを追加するページ(add.blade.php)にタスクを追加する時にバリデーションに引っかかった場合にフォームの中に入力した内容を残す為の記述の「{{old(‘name属性名’)}}」を書いていました。
しかし今はフォームに入力するのではなく既にデータベースに存在する情報をフォームに表示したいです。
その場合は「{{old(‘name属性’, データベースの値)}}」と書けばいいです。
「データベースの値」は41行目の「$task->name」や45行目の「$task->content」でnameやcontentはテーブルのカラム名です。
これでタスクのタイトルと内容を編集するページを表示することができますがタスクを表示しているページ(index.blade.php)とタスクの内容を見るページ(detail.blade.php)からタスクの内容を編集するページに移動できるようにします。
index.blade.phpとdetail.blade.php
index.blade.phpのコードを↓にします。
<style>
    h1 {
        text-align: center;
        padding: 30px;
    }
    .container {
        width: 80%;
        margin: 0 auto;
    }
    .task__add {
        text-align: right;
        padding-bottom: 10px;
    }
    table {
        border-spacing: 0;
        border-collapse: collapse;
        border-bottom: 1px solid #aaa;
        color: #555;
        width: 100%;
    }
    th {
        border-top: 1px solid #aaa;
        background-color: #f5f5f5;
        padding: 10px 0 10px 6px;
        text-align: center;
    }
    td {
        border-top: 1px solid #aaa;
        padding: 10px 0 10px 6px;
        text-align: center;
    }
    a {
        margin-right: 20px;
    }
</style>
<h1>タスク一覧</h1>
<div class="container">
    <div class="task__add">
        <a href="{{route('tasks.add')}}">+タスクを追加する</a>
    </div>
    <table>
        <tr>
            <th>タスク</th>
            <th>アクション</th>
        </tr>
        @foreach ($tasks as $task)
        <tr>
            <td>{{ $task->name }}</td>
            <td>
                <a href="{{route('tasks.detail',['id' => $task->id])}}">詳細</a>
                <a href="{{ route('tasks.edit', ['id' => $task->id]) }}">編集</a>                 //この行を編集
                <a href="">削除</a>
            </td>
        </tr>
        @endforeach
    </table>
</div>
detail.blade.phpのコードを↓にします。
<style>
    h1 {
        text-align: center;
        padding: 30px;
    }
    .container {
        width: 60%;
        margin: 0 auto;
    }
    table {
        width: 100%;
        border-collapse: collapse;
        border-spacing: 0;
    }

    table th,table td {
        padding: 10px 0;
        text-align: center;
    }

    table tr:nth-child(odd){
        background-color: #eee
    }
    .link {
        display: flex;
        justify-content: space-between;
    }
</style>
<h1>タスク詳細</h1>
<div class="container">
    <table>
        <tr>
            <th>ID</th>
            <td>{{ $task->id }}</td>
        </tr>
        <tr>
            <th>タスク</th>
            <td>{{ $task->name }}</td>
        </tr>
        <tr>
            <th>タスク内容</th>
            <td>{{ $task->content }}</td>
        </tr>
        <tr>
            <th>作成日時</th>
            <td>{{ $task->created_at->format('Y年m月d日 H:i') }}</td>
        </tr>
        <tr>
            <th>更新日時</th>
            <td>{{ $task->updated_at->format('Y年m月d日 H:i') }}</td>
        </tr>
    </table>
    <div class="link">
        <div class="link__back">
            <a href="/">戻る</a>
        </div>
        <div class="link__edit">
            <a href="{{ route('tasks.edit', ['id' => $task->id]) }}">編集</a>                 //この行を編集
        </div>
        <div class="link__delete">
            <a href="">削除する</a>
        </div>
    </div>
</div>
これでタスクを表示するページかタスクの内容を表示するページから編集するページに移動するとタスクを編集するページが表示されます。

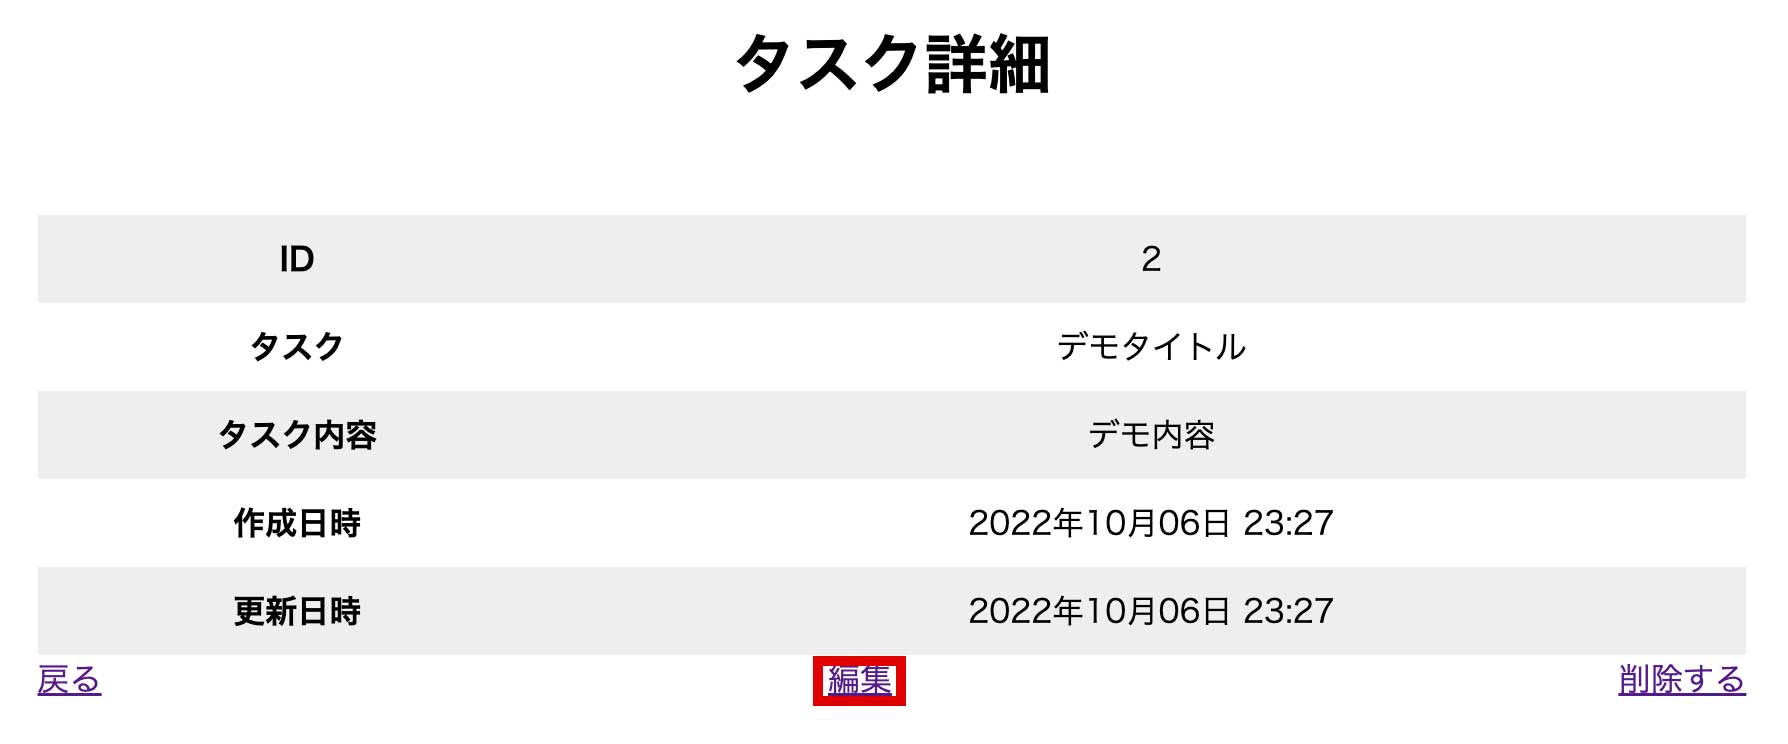
↓は編集ページです。
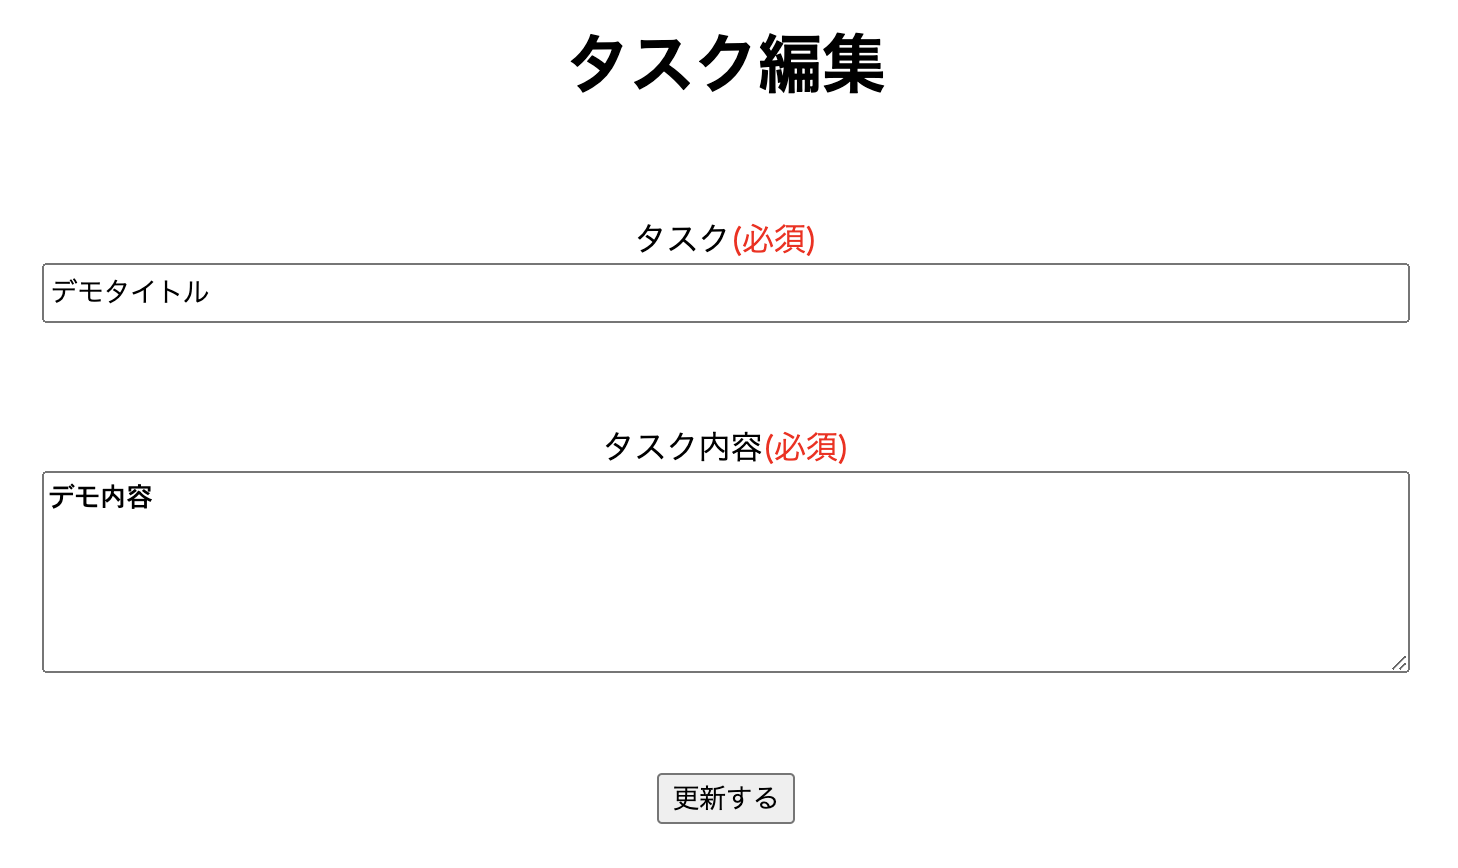
これでタスクを編集するページに移動できましたがタスクのタイトルと内容を編集できるようにします。
タスクを追加したりタスクを編集する場合ですがデータベースが絡んできます。
データベースが絡む場合はそのページに飛ぶ処理とそのページでデータベースとやり取りをする処理をする為に「ルーティング→コントローラー→ビュー」の設定を2回します。
タスクを編集(ルーティングの設定)
web.phpのコードを↓にします。
Route::get('/', [TasksController::class,'index'])->name('tasks.index');

Route::get('/{id}', [TasksController::class,'show'])->name('tasks.detail');

Route::get('/tasks/add', [TasksController::class,'add'])->name('tasks.add');

Route::post('/tasks/add', [TasksController::class,'store'])->name('tasks.store');

Route::get('/tasks/edit/{id}', [TasksController::class, 'edit'])->name('tasks.edit');

Route::post('tasks/edit/{id}', [TasksController::class, 'update'])->name('tasks.update');
次はコントローラーです。
タスクを編集(コントローラーの設定)
TasksController.phpのコードを↓にします。
<?php

namespace App\Http\Controllers;

use Illuminate\Http\Request;
use App\Models\Task;
use App\Http\Requests\TasksRequest;

class TasksController extends Controller
{
    public function index()
    {
        $tasks = Task::orderBy('updated_at', 'desc')->get();
        return view('tasks.index', compact('tasks'));
    }

    public function show($id)
    {
        $task = Task::find($id);
        return view('tasks.detail', compact('task'));
    }

    public function add()
    {
        return view('tasks.add');
    }

    public function store(TasksRequest $request)
    {
        $result = Task::create([
            'name' => $request->name,
            'content' => $request->content
        ]);

        return redirect()->route('tasks.index');
    }

    public function edit($id)
    {
        $task = Task::find($id);
        return view('tasks.edit', compact('task'));
    }


    //ここから追加
    public function update(TasksRequest $request, $id)
    {
        $task = Task::find($id);
        $task->fill([
            'name' => $request->name,
            'content' => $request->content,
        ])
        ->save();

        return redirect()->route('tasks.index');
    }
    //ここまで追加


}
49行目〜52行目でタスクのタイトルと内容を更新して53行目で保存します。
50行目・51行目はタスクを追加した時と考え方が同じです。
最後はビューの設定です。
タスクを編集(edit.blade.phpの編集)
edit.blade.phpのコードを↓にします。
<style>
    h1 {
        text-align: center;
        padding: 30px;
    }
    .error {
        text-align: center;
    }
    .error__message {
        color: red;
    }
    .form {
        width: 80%;
        margin: 0 auto;
        text-align: center;
    }
    .form-group {
        padding-bottom: 50px;
    }
    span {
        color: red;
    }
    input {
        width: 60%;
        height: 30px;
    }
    textarea {
        width: 60%;
    }
</style>
<h1>タスク編集</h1>
<div class="error">
    @foreach ($errors->all() as $error)
      <p class="error__message">{{$error}}</p>
    @endforeach
</div>
<form action="{{ route('tasks.update', ['id' => $task->id]) }}" method="POST" class="form">                   //この行を修正
@csrf
    <div class="form-group">
        <label for="name">タスク<span>(必須)</span></label><br>
        <input type="text" name="name" maxlength="30" placeholder="タスクは30文字で書きましょう。" value="{{ old('name', $task->name) }}">
    </div>
    <div class="form-group">
        <label for="content">タスク内容<span>(必須)</span></label><br>
        <textarea rows="5" name="content" placeholder="タスク内容を具体的に書きましょう">{{ old('content', $task->content) }}</textarea>
    </div>
    <button type="submit">更新する</button>
</form>
これで編集ができるようになります。
最後はタスクの削除です。
タスクの削除
タスクの追加・編集はページに移動して追加・編集をするので「ルーティング→コントローラー→ビュー」の操作を2回しますが今回はページに移動するのではなく削除だけするので操作は1回になります。
タスクが表示されるページ(index.blade.php)とタスクの中身が表示されるページ(detail.blade.php)でタスクの削除ができるようにします。
index.blade.phpとdetail.blade.php
index.blade.phpのコードを↓にします。
<style>
    h1 {
        text-align: center;
        padding: 30px;
    }
    .container {
        width: 80%;
        margin: 0 auto;
    }
    .task__add {
        text-align: right;
        padding-bottom: 10px;
    }
    table {
        border-spacing: 0;
        border-collapse: collapse;
        border-bottom: 1px solid #aaa;
        color: #555;
        width: 100%;
    }
    th {
        border-top: 1px solid #aaa;
        background-color: #f5f5f5;
        padding: 10px 0 10px 6px;
        text-align: center;
    }


    //ここから追加
    .td1 {
        border-top: 1px solid #aaa;
        padding: 10px 0 10px 6px;
        text-align: center;
    }
    .td2 {
        border-top: 1px solid #aaa;
        padding: 10px 0 10px 6px;
        display: flex;
        justify-content: center;
    }
    //ここまで追加

    a {
        margin-right: 20px;
    }
</style>
<h1>タスク一覧</h1>
<div class="container">
    <div class="task__add">
        <a href="{{ route('tasks.add') }}">+タスクを追加する</a>
    </div>
    <table>
        <tr>
            <th>タスク</th>
            <th>アクション</th>
        </tr>
        @foreach ($tasks as $task)
        <tr>
            <td class="td1">{{ $task->name }}</td>                                    //この行を修正
            <td class="td2">                                                          //この行を修正
                <a href="{{ route('tasks.detail', ['id' => $task->id]) }}">詳細</a>
                <a href="{{ route('tasks.edit', ['id' => $task->id]) }}">編集</a>


                //ここから編集
                <form action="{{ route('tasks.delete', ['id' => $task->id]) }}" method="POST">
                @csrf
                    <button type="submit">削除</button>
                </form>
                //ここまで編集


            </td>
        </tr>
        @endforeach
    </table>
</div>
タスクの中身を見る事ができるページへの移動とタスクを編集するページへの移動はaタグですが削除ボタンはformタグ
(67行目〜70行目)になっていますがなぜformタグを使うかの説明をします。
ルーティング→コントローラー→ビューの流れが分かってないといけないですが例としてある人が見たいページに接続してルーターがコントローラーに指示を出してコントローラーがモデルに指示を出してデータベースからデータを持ってきて貰ってそれを受け取ってビューに渡して見たいページを表示します。
削除ボタンを押した時にどこかのページに移動するのではなく削除するページの情報をコントローラーに渡さないといけないからformを使っています。
detail.blade.phpのコードを↓にします。
<style>
    h1 {
        text-align: center;
        padding: 30px;
    }
    .container {
        width: 60%;
        margin: 0 auto;
    }
    table {
        width: 100%;
        border-collapse: collapse;
        border-spacing: 0;
    }

    table th,table td {
        padding: 10px 0;
        text-align: center;
    }

    table tr:nth-child(odd){
        background-color: #eee
    }
    .link {
        display: flex;
        justify-content: space-between;
    }
</style>
<h1>タスク詳細</h1>
<div class="container">
    <table>
        <tr>
            <th>ID</th>
            <td>{{ $task->id }}</td>
        </tr>
        <tr>
            <th>タスク</th>
            <td>{{ $task->name }}</td>
        </tr>
        <tr>
            <th>タスク内容</th>
            <td>{{ $task->content }}</td>
        </tr>
        <tr>
            <th>作成日時</th>
            <td>{{ $task->created_at->format('Y年m月d日 H:i') }}</td>
        </tr>
        <tr>
            <th>更新日時</th>
            <td>{{ $task->updated_at->format('Y年m月d日 H:i') }}</td>
        </tr>
    </table>
    <div class="link">
        <div class="link__back">
            <a href="/">戻る</a>
        </div>
        <div class="link__edit">
            <a href="{{ route('tasks.edit', ['id' => $task->id]) }}">編集する</a>
        </div>
        <div class="link__delete">
            <form action="{{ route('tasks.delete', ['id' => $task->id]) }}" method="POST">            //この行を編集
                @csrf
                    <button type="submit">削除</button>
            </form>
        </div>
    </div>
</div>
タスクの削除(ルーティングの設定)
web.phpを↓にします。
<?php

use Illuminate\Support\Facades\Route;
use App\Http\Controllers\TasksController;

/*
|--------------------------------------------------------------------------
| Web Routes
|--------------------------------------------------------------------------
|
| Here is where you can register web routes for your application. These
| routes are loaded by the RouteServiceProvider within a group which
| contains the "web" middleware group. Now create something great!
|
*/

Route::get('/', [TasksController::class, 'index'])->name('tasks.index');

Route::get('/{id}', [TasksController::class, 'show'])->name('tasks.show');

Route::get('/tasks/add', [TasksController::class, 'add'])->name('tasks.add');

Route::post('/tasks/add', [TasksController::class, 'store'])->name('tasks.store');

Route::get('/tasks/edit/{id}', [TasksController::class, 'edit'])->name('tasks.edit');

Route::post('tasks/edit/{id}', [TasksController::class, 'update'])->name('tasks.update');

Route::post('tasks/delete/{id}', [TasksController::class, 'delete'])->name('tasks.delete');                              //この行を追加
29行目を追加していますが「tasks.delete」はそのページに移動しなくていいので何でもいいです。
次はコントローラーです。
タスクの削除(コントローラーの設定)
TasksController.phpを↓にします。
<?php

namespace App\Http\Controllers;

use Illuminate\Http\Request;
use App\Models\Task;
use App\Http\Requests\TasksRequest;

class TasksController extends Controller
{
    public function index()
    {
        $tasks = Task::orderBy('updated_at', 'desc')->get();
        return view('tasks.index', compact('tasks'));
    }

    public function show($id)
    {
        $task = Task::find($id);
        return view('tasks.detail', compact('task'));
    }

    public function add()
    {
        return view('tasks.add');
    }

    public function store(TasksRequest $request)
    {
        $result = Task::create([
            'name' => $request->name,
            'content' => $request->content
        ]);

        return redirect()->route('tasks.index');
    }

    public function edit($id)
    {
        $task = Task::find($id);
        return view('tasks.edit', compact('task'));
    }

    public function update(TasksRequest $request, $id)
    {
        $task = Task::find($id);
        $task->fill([
            'name' => $request->name,
            'content' => $request->content,
        ])
        ->save();

        return redirect()->route('tasks.index');
    }


    //ここから追加
    public function delete($id)
    {
        $task = Task::destroy($id);

        return redirect()->route('tasks.index');
    }
    //ここまで追加


}
いつもなら次はビューですが削除をするためのページはないです。
これでLaravelを使ったTODOアプリの完成です。

