Laravelでテーブルに値を登録時にNotificationで通知メールを送る方法
1244 回閲覧されました
みなさんこんにちは、jonioです。
今回はTodoアプリでタスクを作成した時にNotificationを使って通知メールを送る機能の実装方法を解説します。
Laravelのバージョン
今回は8系で実装していますがコードの書き方が変わらない限りバージョンが上がっても使えると思います。
注意点
今回の解説はメール通知なのでタスクの作成方法については解説しません。
今回登場するテーブル
usersテーブルとtasksテーブルです。
tasksテーブルはtitleカラムの値を通知メールに使います。
Notificationの作成
作成するNotification名を「TaskPublished」とします、下記のコマンドを叩きます。
php artisan make:notification TaskPublished「Laravelのプロジェクト > app > Notifications」の下の階層にTaskPublished.phpが作成されます。
タスクの作成(モデルとアクション)
コードを下記にします。
//モデル

<?php

namespace App\Models;

use Illuminate\Database\Eloquent\Factories\HasFactory;
use Illuminate\Database\Eloquent\Model;
use Illuminate\Support\Facades\Auth;
use App\Models\User;
use App\Notifications\TaskPublished;         //この行を追加


class Task extends Model
{
    use HasFactory;

    protected $fillable = [
        'title',
        'memo',
        'deadline',
        'user_id',
        'complete_flag'
    ];

    public function taskStore($request){
        $inputs = $request->validate([
            'title' => 'required',
            'deadline' => 'required'
        ]);

        $taskContent = Task::create([
            'title' => $inputs['title'],
            'memo' => $request->memo,
            'deadline' => $inputs['deadline'],
            'user_id' => Auth()->user()->id
        ]);


        //ここから追加
        $user = User::find(1);

        $user->notify(new TaskPublished($taskContent));
        //ここまで追加


    }
}


//アクション
public function store(Task $task, Request $request){
  $task->taskStore($request);

  return redirect('/task/index')->with('message', 'タスクを作成しました');
}
11行目はNotificationを使う為の記述です。
41行目〜43行目はUsersテーブルのid=1の人に通知を送るための記述です。
私が実装した時はid=1が管理人なので39行目の記述をしましたが自分自身に通知を送りたい場合もあると思います。
その場合は下記に変更します。
$user = Auth::user();話を戻して32行目の「$taskContent」を43行目の引数に渡します。
これはタスクを作成した時に通知メールにタスクの内容を書き込むのに必要です。
TaskPublished.php
下記の記述をします。
<?php

namespace App\Notifications;

use Illuminate\Bus\Queueable;
use Illuminate\Contracts\Queue\ShouldQueue;
use Illuminate\Notifications\Messages\MailMessage;
use Illuminate\Notifications\Notification;
use App\Models\Task;                                                    //この行を追加


class TaskPublished extends Notification
{
    use Queueable;

    public $task;         //この行を追加

    /**
     * Create a new notification instance.
     *
     * @return void
     */


    //ここから修正
    public function __construct(Task $task)
    {
        $this->task = $task;
    }
    //ここまで修正


    /**
     * Get the notification's delivery channels.
     *
     * @param  mixed  $notifiable
     * @return array
     */
    public function via($notifiable)
    {
        return ['mail'];
    }

    /**
     * Get the mail representation of the notification.
     *
     * @param  mixed  $notifiable
     * @return \Illuminate\Notifications\Messages\MailMessage
     */


    //ここから修正
    public function toMail($notifiable)
    {
        return (new MailMessage)
        ->subject('新しいタスクが作成されました')
        ->line('タイトル: ' . $this->task->title)
    }
    //ここまで修正
                       ・
                       ・
                       ・
}
9行目はtasksタスクの内容が保存されているテーブルを使う為の記述です。
26行目〜29行目はtasksテーブルの値をTaskPublishedクラスのプロパティにセットしています。
インスタンスを作成しているのは55行目の「new MailMessage」です。
これで57行目の「$this->task->title」でtasksテーブルのtitleカラムの値をメールで通知することができます。
動作確認
タスクを作成すると下記のメールが届きます、赤枠の内容が作成したタスクです。
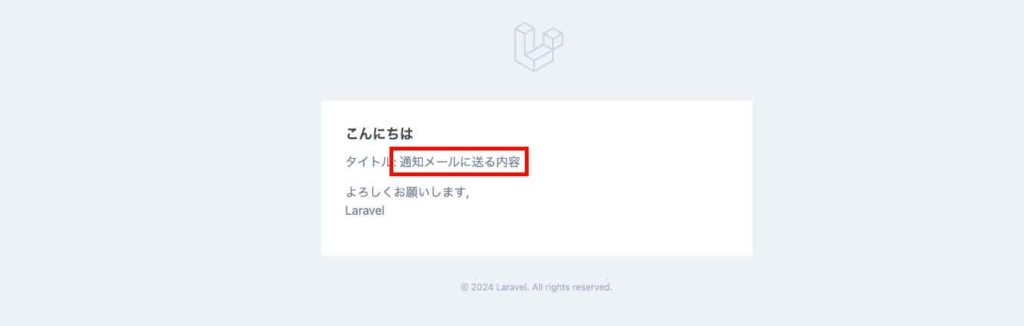
これで実装が完成です。