Laravelでお問合せフォームの実装②お問合せ返信メールの送信

3349 回閲覧されました
みなさんこんにちは、jonioです。
前回はお問合せフォームの内容を送信した時にデータベースのテーブルに保存する所までの解説をしました。
今回はお問合せフォームを送信した時にMailableを使って自動返信メールの実装方法の解説をします。
本番環境ではメールに使うサーバーはレンタルサーバーを使うと思うのですが今回はGmailを使います。
目次
アプリパスワードの取得
chromeのアプリパスワードをLaravelの「.env」に記述しないといけないので取得します。
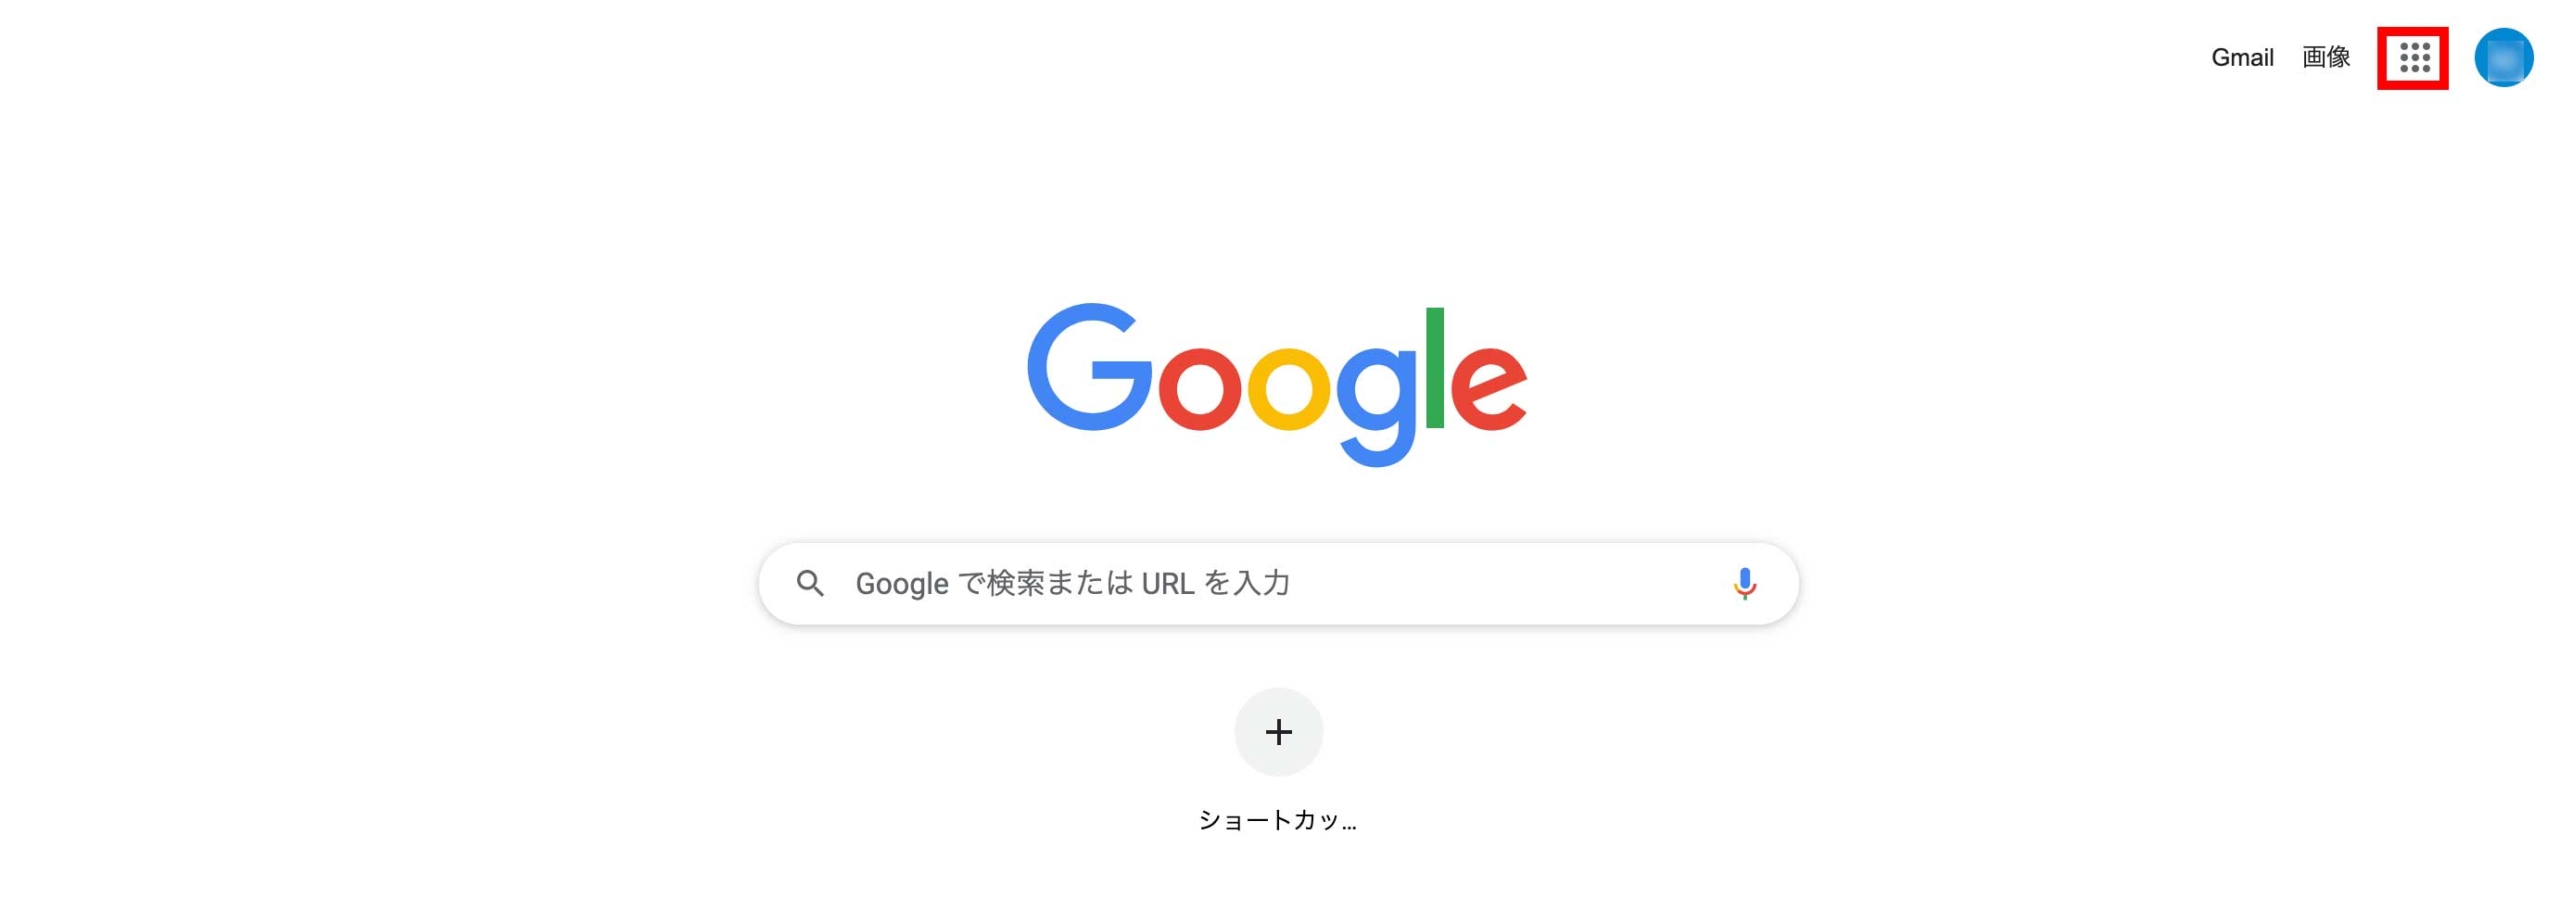
下記の画面に移動して赤枠をクリックします。
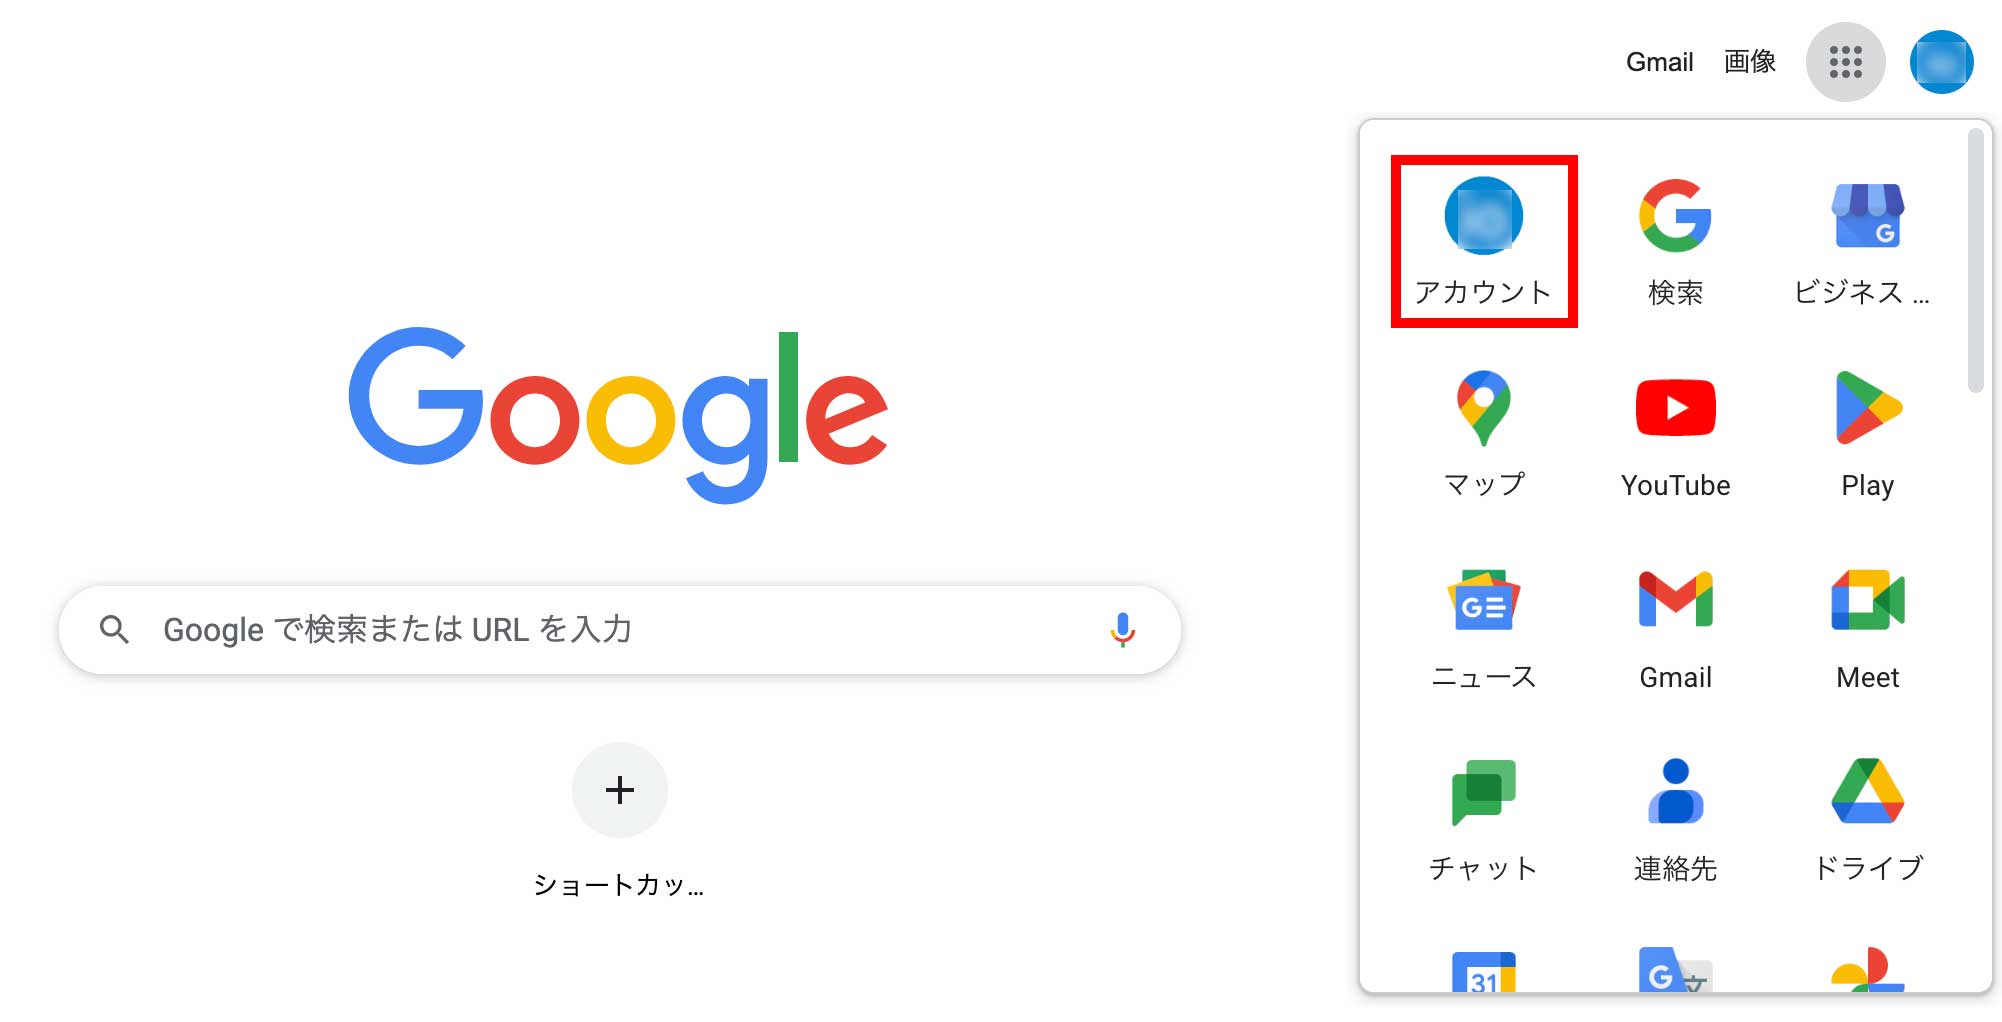
そして「アカウント」をクリックします。
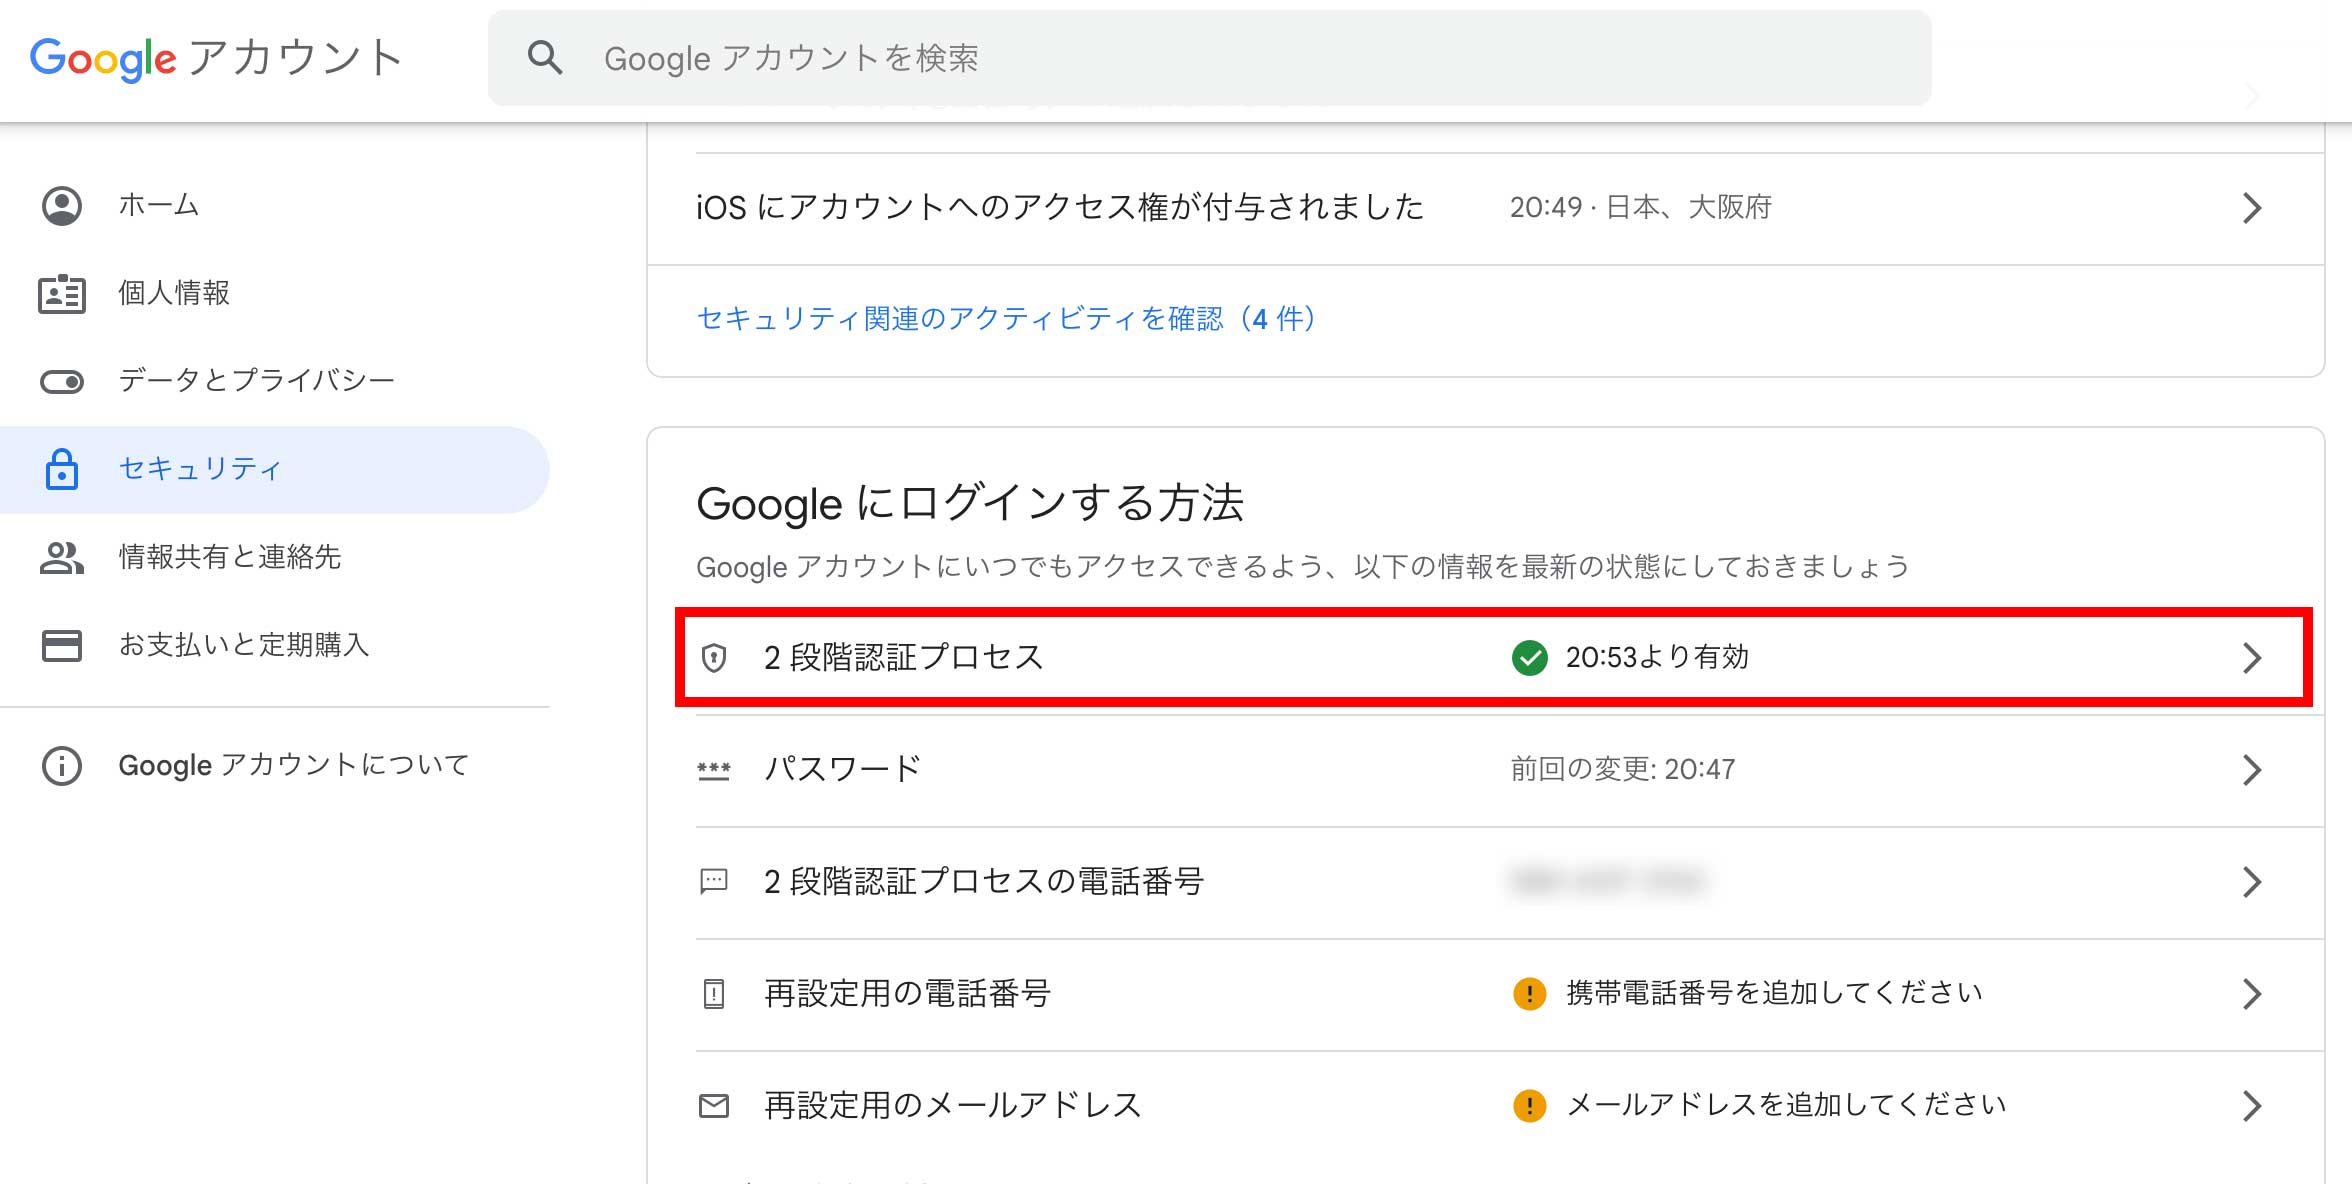
そして「セキュリティ」をクリックします。

私は2段階認証をしていますがそれをしないとメールの送信に必要なアプリパスワード(あとで説明します)の設定ができないので2段階認証を設定してください。
そしてセキュリティのページで「2段階認証プロセス」の項目をクリックします。
そしてページ一番下の「アプリパスワード」の項目をクリックします。
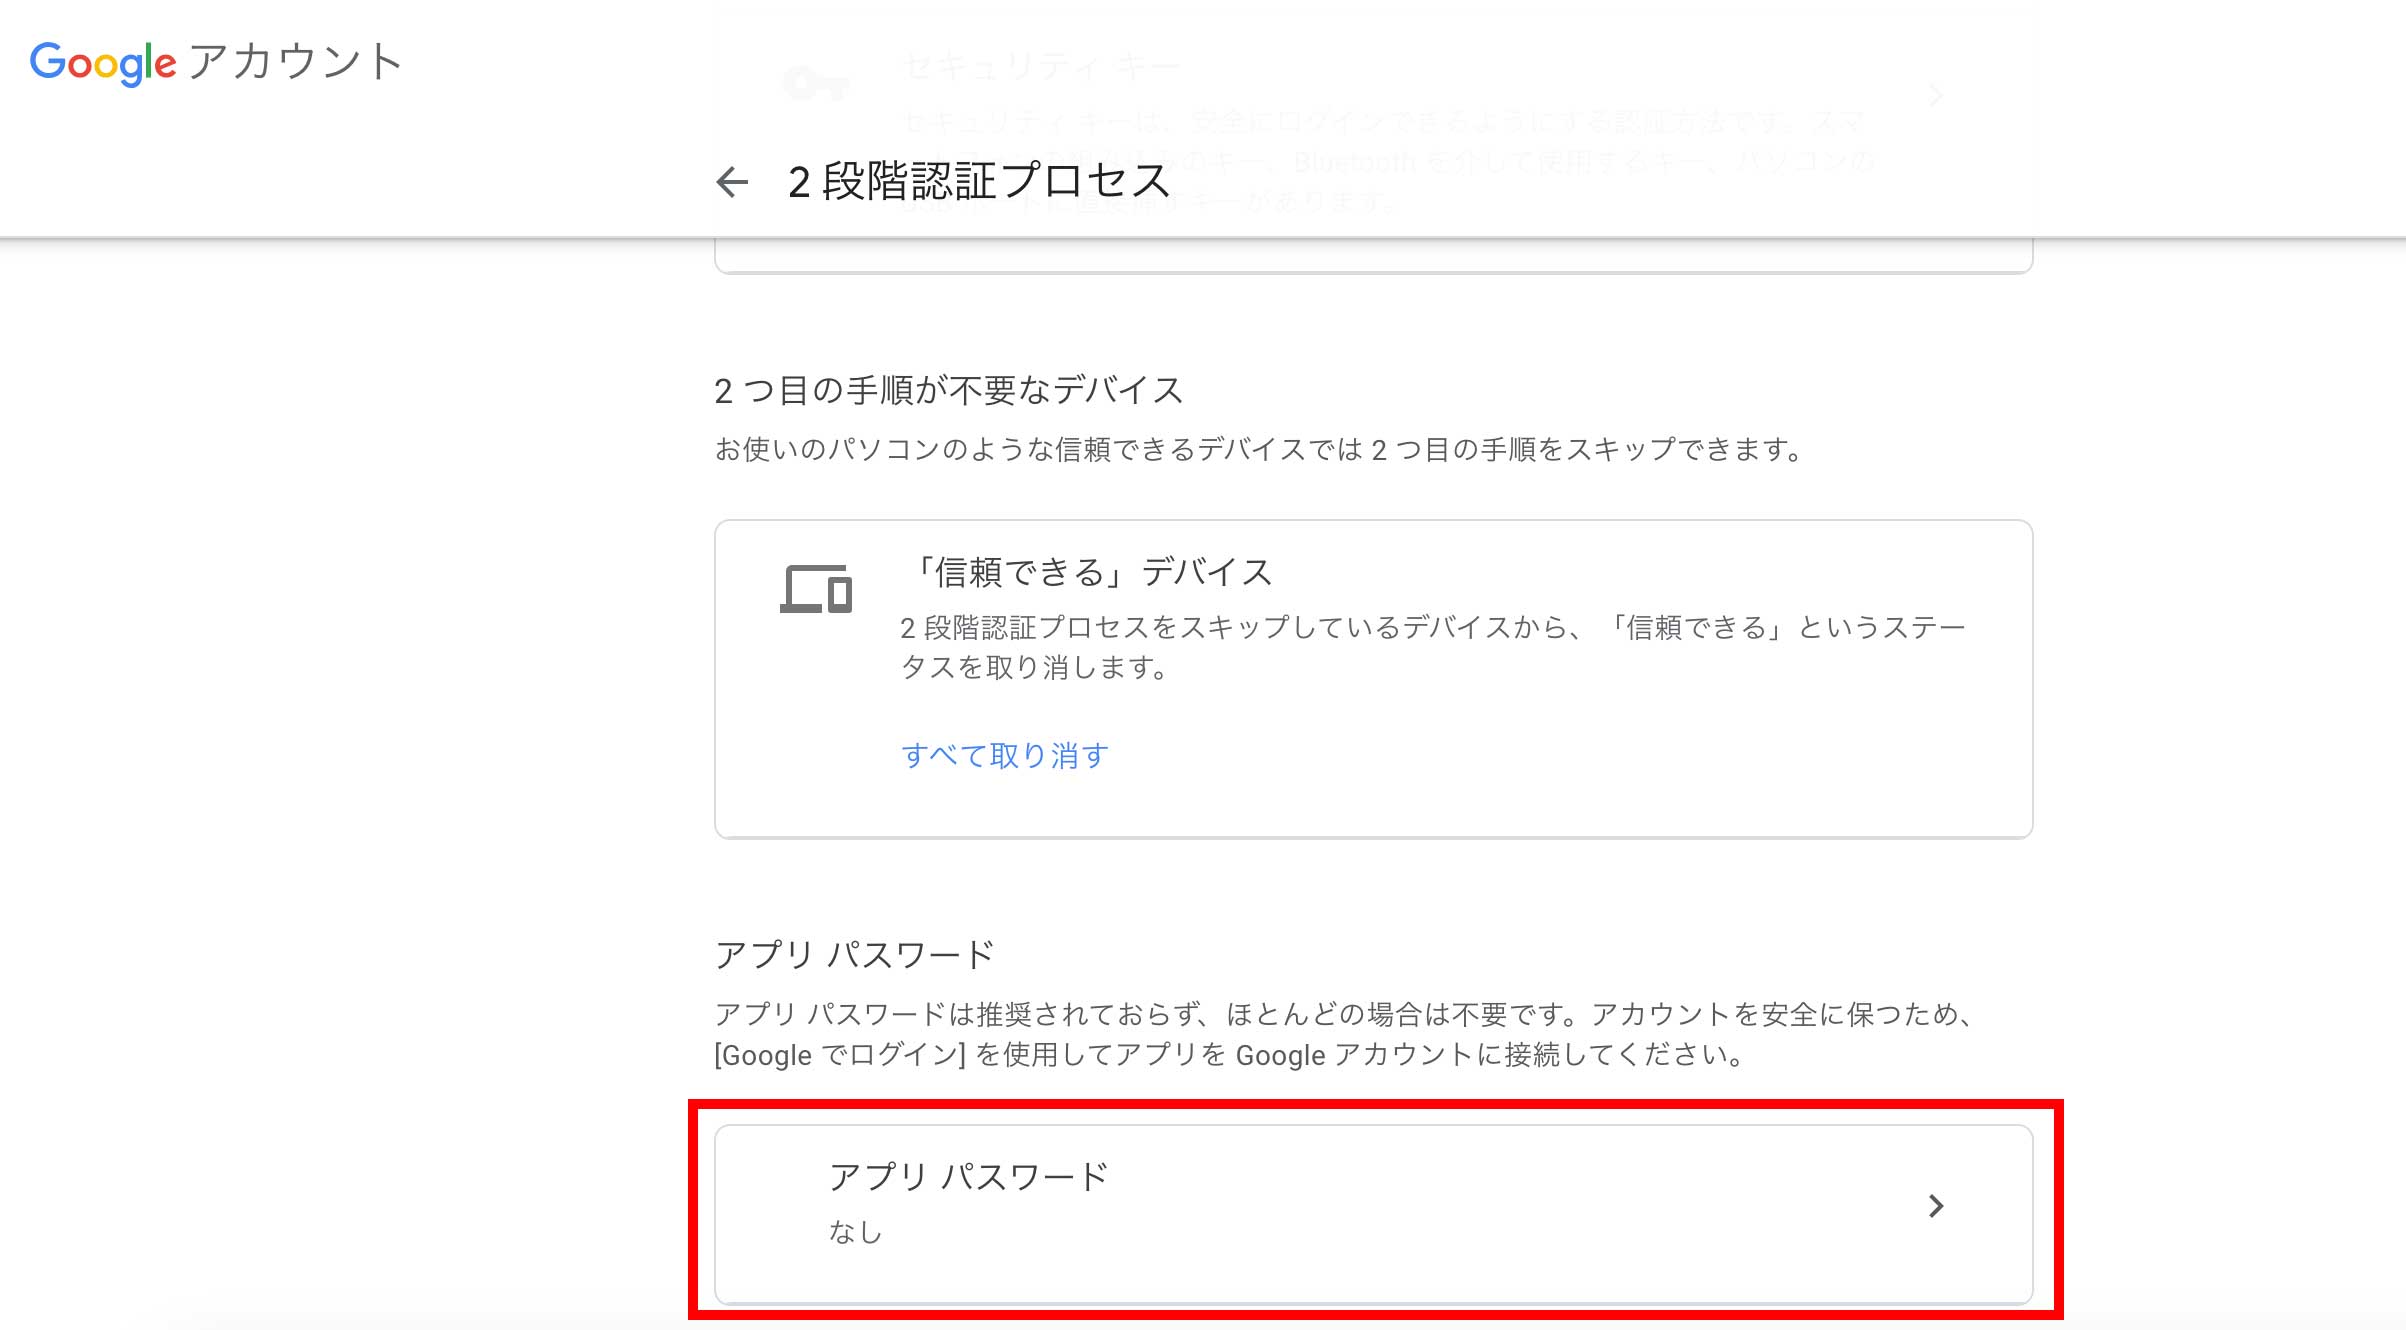
すると下記の画面になるので「アプリを選択」・「デバイスを選択」を選択します。
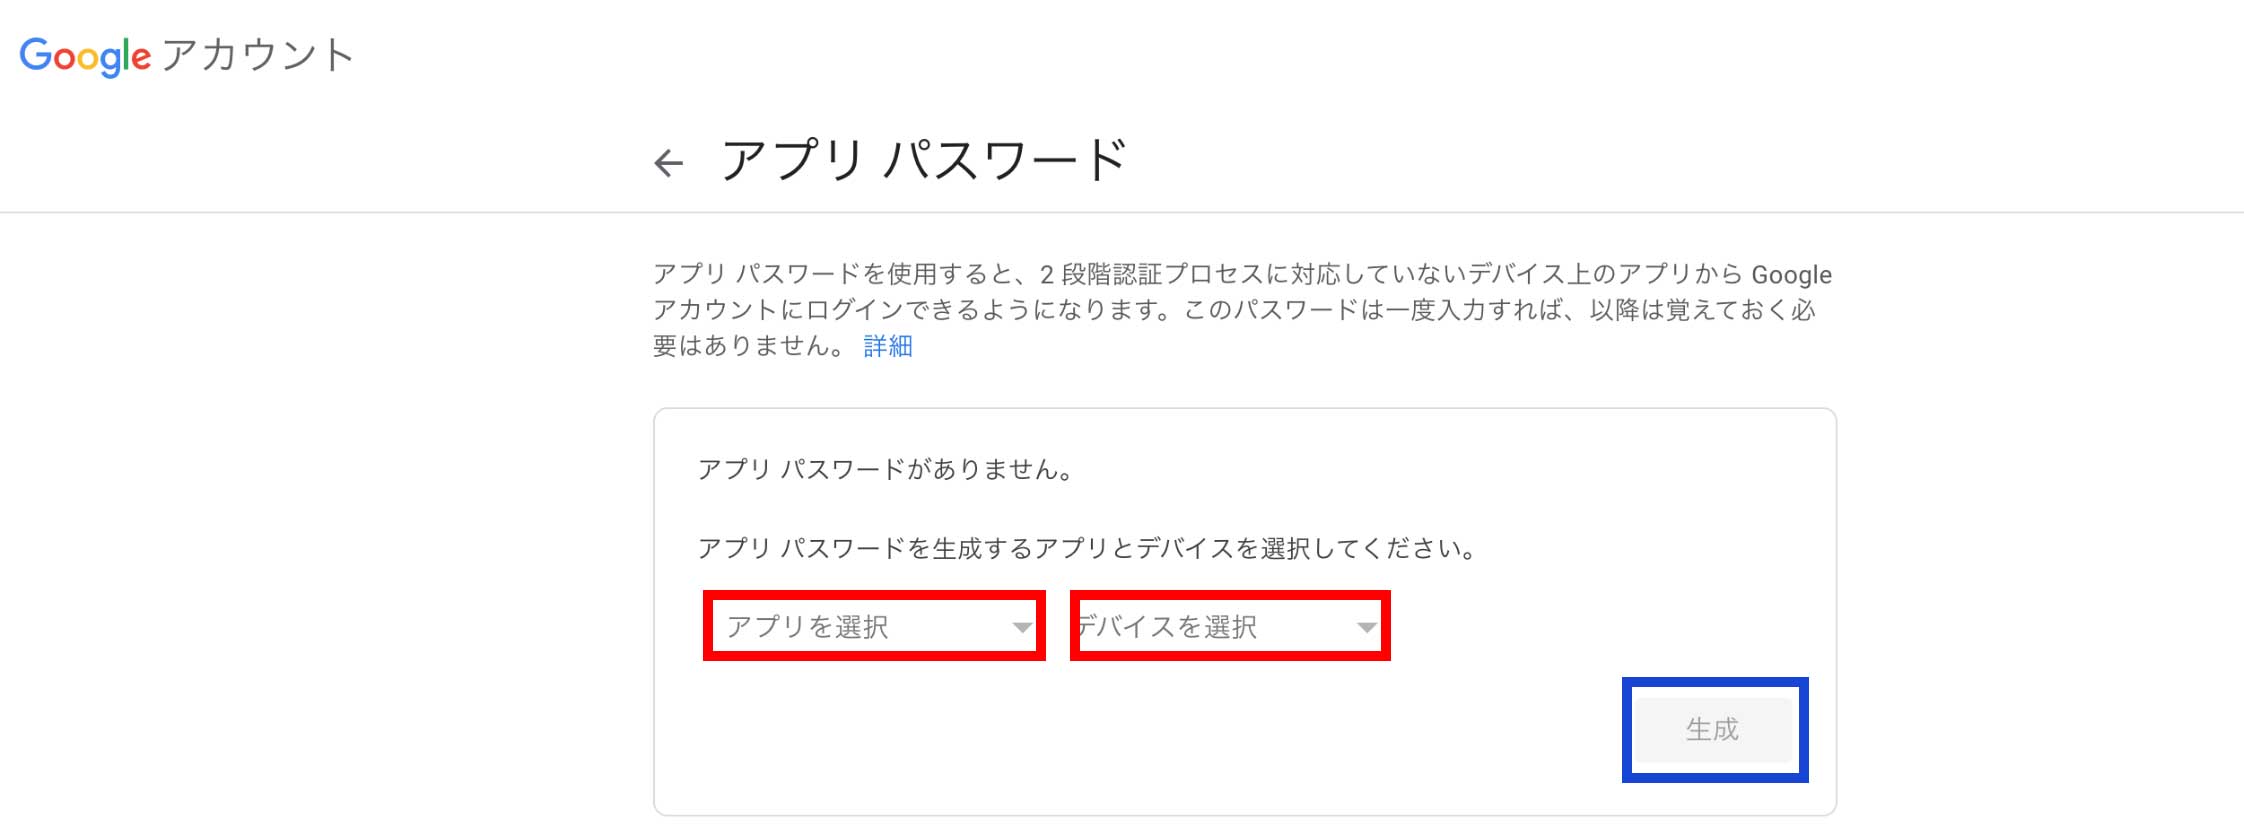
選択は以下となります。
- アプリを選択 : メール
- デバイスを選択 : その他 → アプリの名前を入力
そして画面右下の「生成」を押すと次のページでアプリパスワードが表示されます。
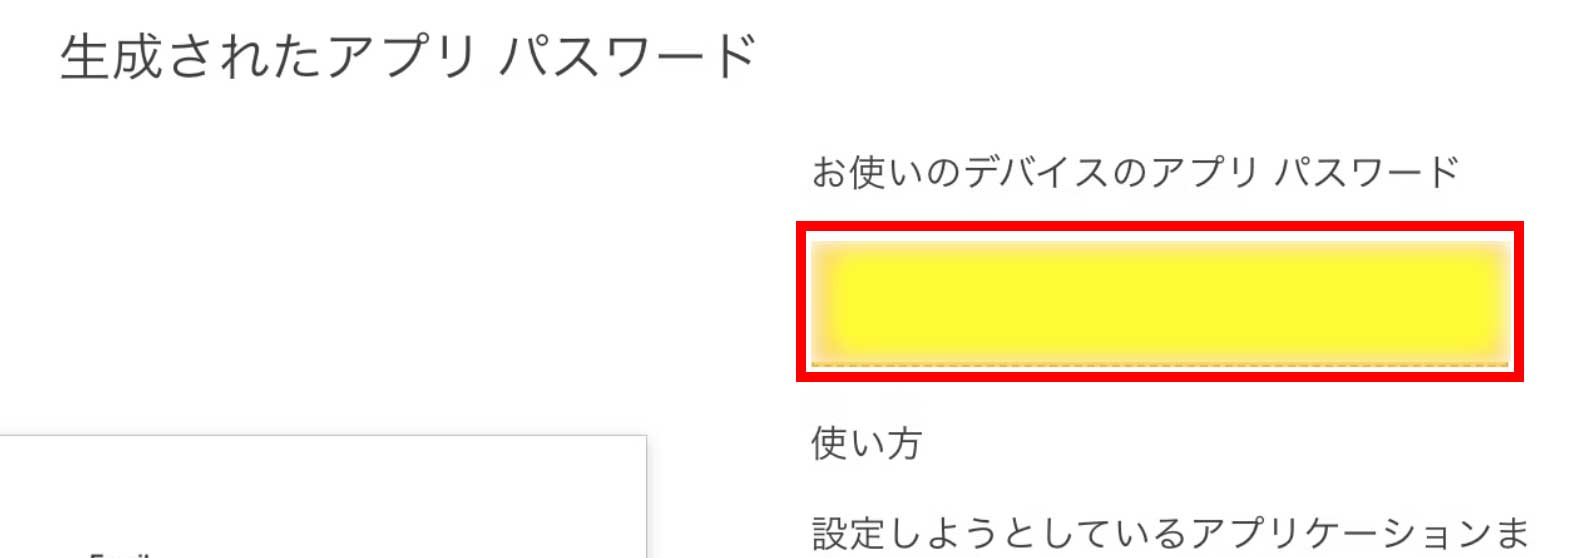
アプリパスワードはあとで使うので何かに控えて下さい。
次はLaravelプロジェクトの直下にある「.env」の編集です。
.envの編集
Laravelプロジェクトの直下にある.envの下記を編集します。
MAIL_DRIVER=smtp
MAIL_HOST=smtp.gmail.com
MAIL_PORT=587
MAIL_USERNAME=自分のメールアドレス
MAIL_PASSWORD=発行したアプリパスワード
MAIL_FROM_ADDRESS=MAIL_USERNAMEと同じメールアドレス
MAIL_FROM_NAME=メール送信元名
MAIL_ADMIN=管理者側に通知するメールアドレス
4行目の「自分のメールアドレス」は使いたいメールアドレスを記入します。
7行目の「メール送信元名」はメール送信者の名前を記入します。
8行目は新しく追加していますが「管理者側に通知するメールアドレス」は管理者のメールアドレスを記入します。
ここまでが終わったら「Laravelのプロジェクト > app >config > mail.php」を開いて98行目あたりに追記します。(バージョン8の場合)
<?php

return [

    /*
    |--------------------------------------------------------------------------
    | Default Mailer
    |--------------------------------------------------------------------------
    |
    | This option controls the default mailer that is used to send any email
    | messages sent by your application. Alternative mailers may be setup
    | and used as needed; however, this mailer will be used by default.
    |
    */

    'default' => env('MAIL_MAILER', 'smtp'),

    /*
    |--------------------------------------------------------------------------
    | Mailer Configurations
    |--------------------------------------------------------------------------
    |
    | Here you may configure all of the mailers used by your application plus
    | their respective settings. Several examples have been configured for
    | you and you are free to add your own as your application requires.
    |
    | Laravel supports a variety of mail "transport" drivers to be used while
    | sending an e-mail. You will specify which one you are using for your
    | mailers below. You are free to add additional mailers as required.
    |
    | Supported: "smtp", "sendmail", "mailgun", "ses",
    |            "postmark", "log", "array", "failover"
    |
    */

    'mailers' => [
        'smtp' => [
            'transport' => 'smtp',
            'host' => env('MAIL_HOST', 'smtp.mailgun.org'),
            'port' => env('MAIL_PORT', 587),
            'encryption' => env('MAIL_ENCRYPTION', 'tls'),
            'username' => env('MAIL_USERNAME'),
            'password' => env('MAIL_PASSWORD'),
            'timeout' => null,
            'auth_mode' => null,
        ],

        'ses' => [
            'transport' => 'ses',
        ],

        'mailgun' => [
            'transport' => 'mailgun',
        ],

        'postmark' => [
            'transport' => 'postmark',
        ],

        'sendmail' => [
            'transport' => 'sendmail',
            'path' => env('MAIL_SENDMAIL_PATH', '/usr/sbin/sendmail -t -i'),
        ],

        'log' => [
            'transport' => 'log',
            'channel' => env('MAIL_LOG_CHANNEL'),
        ],

        'array' => [
            'transport' => 'array',
        ],

        'failover' => [
            'transport' => 'failover',
            'mailers' => [
                'smtp',
                'log',
            ],
        ],
    ],

    /*
    |--------------------------------------------------------------------------
    | Global "From" Address
    |--------------------------------------------------------------------------
    |
    | You may wish for all e-mails sent by your application to be sent from
    | the same address. Here, you may specify a name and address that is
    | used globally for all e-mails that are sent by your application.
    |
    */

    'from' => [
        'address' => env('MAIL_FROM_ADDRESS', 'hello@example.com'),
        'name' => env('MAIL_FROM_NAME', 'Example'),
    ],
    'admin'=>env('MAIL_ADMIN', null),                       //この行を追加

    /*
    |--------------------------------------------------------------------------
    | Markdown Mail Settings
    |--------------------------------------------------------------------------
    |
    | If you are using Markdown based email rendering, you may configure your
    | theme and component paths here, allowing you to customize the design
    | of the emails. Or, you may simply stick with the Laravel defaults!
    |
    */

    'markdown' => [
        'theme' => 'default',

        'paths' => [
            resource_path('views/vendor/mail'),
        ],
    ],

];
98行目の意味は「adminは.envのMAIL_ADMINを使うが、もし設定がなければnull(何もなし)とする」という意味になります。
バージョン10の場合は下記の114行目を追加します。
<?php

return [

    /*
    |--------------------------------------------------------------------------
    | Default Mailer
    |--------------------------------------------------------------------------
    |
    | This option controls the default mailer that is used to send any email
    | messages sent by your application. Alternative mailers may be setup
    | and used as needed; however, this mailer will be used by default.
    |
    */

    'default' => env('MAIL_MAILER', 'smtp'),

    /*
    |--------------------------------------------------------------------------
    | Mailer Configurations
    |--------------------------------------------------------------------------
    |
    | Here you may configure all of the mailers used by your application plus
    | their respective settings. Several examples have been configured for
    | you and you are free to add your own as your application requires.
    |
    | Laravel supports a variety of mail "transport" drivers to be used while
    | sending an e-mail. You will specify which one you are using for your
    | mailers below. You are free to add additional mailers as required.
    |
    | Supported: "smtp", "sendmail", "mailgun", "ses", "ses-v2",
    |            "postmark", "log", "array", "failover", "roundrobin"
    |
    */

    'mailers' => [
        'smtp' => [
            'transport' => 'smtp',
            'url' => env('MAIL_URL'),
            'host' => env('MAIL_HOST', 'smtp.mailgun.org'),
            'port' => env('MAIL_PORT', 587),
            'encryption' => env('MAIL_ENCRYPTION', 'tls'),
            'username' => env('MAIL_USERNAME'),
            'password' => env('MAIL_PASSWORD'),
            'timeout' => null,
            'local_domain' => env('MAIL_EHLO_DOMAIN'),
        ],

        'ses' => [
            'transport' => 'ses',
        ],

        'postmark' => [
            'transport' => 'postmark',
            // 'message_stream_id' => null,
            // 'client' => [
            //     'timeout' => 5,
            // ],
        ],

        'mailgun' => [
            'transport' => 'mailgun',
            // 'client' => [
            //     'timeout' => 5,
            // ],
        ],

        'sendmail' => [
            'transport' => 'sendmail',
            'path' => env('MAIL_SENDMAIL_PATH', '/usr/sbin/sendmail -bs -i'),
        ],

        'log' => [
            'transport' => 'log',
            'channel' => env('MAIL_LOG_CHANNEL'),
        ],

        'array' => [
            'transport' => 'array',
        ],

        'failover' => [
            'transport' => 'failover',
            'mailers' => [
                'smtp',
                'log',
            ],
        ],

        'roundrobin' => [
            'transport' => 'roundrobin',
            'mailers' => [
                'ses',
                'postmark',
            ],
        ],
    ],

    /*
    |--------------------------------------------------------------------------
    | Global "From" Address
    |--------------------------------------------------------------------------
    |
    | You may wish for all e-mails sent by your application to be sent from
    | the same address. Here, you may specify a name and address that is
    | used globally for all e-mails that are sent by your application.
    |
    */

    'from' => [
        'address' => env('MAIL_FROM_ADDRESS', 'hello@example.com'),
        'name' => env('MAIL_FROM_NAME', 'Example'),
    ],
    'admin'=>env('MAIL_ADMIN', null),        //この行を追加

    /*
    |--------------------------------------------------------------------------
    | Markdown Mail Settings
    |--------------------------------------------------------------------------
    |
    | If you are using Markdown based email rendering, you may configure your
    | theme and component paths here, allowing you to customize the design
    | of the emails. Or, you may simply stick with the Laravel defaults!
    |
    */

    'markdown' => [
        'theme' => 'default',

        'paths' => [
            resource_path('views/vendor/mail'),
        ],
    ],

];
.envに新しく項目を追加したらmail.phpにも記述しないといけませんが理由を説明します。
.envファイルとconfigファイルの役割
「Laravelのプロジェクト > config」の中にあるファイル(↓の赤枠)をconfigファイルと言います。
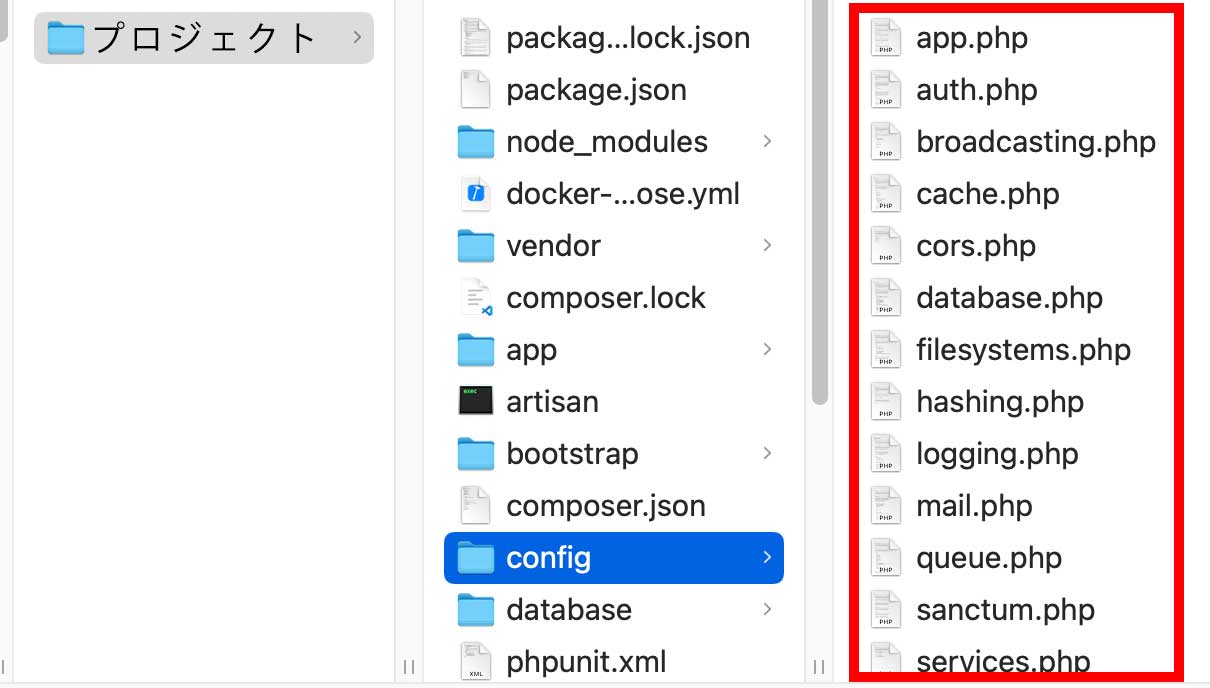
.envファイル・configファイルの両方とも設定ファイルですが役割が違います。
.envはenvironment(環境)の略で環境設定のファイルであり本番環境と開発環境で.envを変える事ができます。
それに対してconfigファイルは開発環境・本番環境のどちらでも使える設定をする為のファイルです。
ちなみにconfigはconfigrationの略です。
ここでconfigファイルのmail.phpの中身を見てみましょう。
<?php

return [

    /*
    |--------------------------------------------------------------------------
    | Default Mailer
    |--------------------------------------------------------------------------
    |
    | This option controls the default mailer that is used to send any email
    | messages sent by your application. Alternative mailers may be setup
    | and used as needed; however, this mailer will be used by default.
    |
    */

    'default' => env('MAIL_MAILER', 'smtp'),

    /*
    |--------------------------------------------------------------------------
    | Mailer Configurations
    |--------------------------------------------------------------------------
    |
    | Here you may configure all of the mailers used by your application plus
    | their respective settings. Several examples have been configured for
    | you and you are free to add your own as your application requires.
    |
    | Laravel supports a variety of mail "transport" drivers to be used while
    | sending an e-mail. You will specify which one you are using for your
    | mailers below. You are free to add additional mailers as required.
    |
    | Supported: "smtp", "sendmail", "mailgun", "ses",
    |            "postmark", "log", "array", "failover"
    |
    */

    'mailers' => [
        'smtp' => [
            'transport' => 'smtp',
            'host' => env('MAIL_HOST', 'smtp.mailgun.org'),
            'port' => env('MAIL_PORT', 587),
            'encryption' => env('MAIL_ENCRYPTION', 'tls'),
            'username' => env('MAIL_USERNAME'),
            'password' => env('MAIL_PASSWORD'),
            'timeout' => null,
            'auth_mode' => null,
        ],

        'ses' => [
            'transport' => 'ses',
        ],

        'mailgun' => [
            'transport' => 'mailgun',
        ],

        'postmark' => [
            'transport' => 'postmark',
        ],

        'sendmail' => [
            'transport' => 'sendmail',
            'path' => env('MAIL_SENDMAIL_PATH', '/usr/sbin/sendmail -t -i'),
        ],

        'log' => [
            'transport' => 'log',
            'channel' => env('MAIL_LOG_CHANNEL'),
        ],

        'array' => [
            'transport' => 'array',
        ],

        'failover' => [
            'transport' => 'failover',
            'mailers' => [
                'smtp',
                'log',
            ],
        ],
    ],

    /*
    |--------------------------------------------------------------------------
    | Global "From" Address
    |--------------------------------------------------------------------------
    |
    | You may wish for all e-mails sent by your application to be sent from
    | the same address. Here, you may specify a name and address that is
    | used globally for all e-mails that are sent by your application.
    |
    */

    'from' => [
        'address' => env('MAIL_FROM_ADDRESS', 'hello@example.com'),
        'name' => env('MAIL_FROM_NAME', 'Example'),
    ],
    'admin'=>env('MAIL_ADMIN', null),

    /*
    |--------------------------------------------------------------------------
    | Markdown Mail Settings
    |--------------------------------------------------------------------------
    |
    | If you are using Markdown based email rendering, you may configure your
    | theme and component paths here, allowing you to customize the design
    | of the emails. Or, you may simply stick with the Laravel defaults!
    |
    */

    'markdown' => [
        'theme' => 'default',

        'paths' => [
            resource_path('views/vendor/mail'),
        ],
    ],

];
いたる所に「env」がありますがこれはデフォルトで.envファイルを読み込む為の設定でconfigファイルでenvファイルを読み込む設定をする事で開発環境・本番環境と環境が変わってもその時のenvファイルを読み込んで不具合が起きないようにしています。
だからenvファイルにデフォルトで存在しない新しい項目を追加した場合はconfigファイルで新しい設定を読み込む為の記述をしないといけません。
これが.envに新しく項目を追加したらmail.phpにも記述しないといない理由です。
ここで疑問を感じると思うのですが設定ファイルをenvファイルとconfigファイルの2つに分けるのではなく全部envファイルに設定すればいいと思いませんか?
でもこれはマズイです。
Laravelでは本番環境に移行する際にコンフィギュレーションキャッシュをしますが↓のコマンドで行います。
php artisan config:cache これをすると設定ファイルを一つにまとめて読み込みスピードを速くしますがenvファイルが読み込まれなくなります。
だからconfigファイルでenvファイルを読み込む必要が出てくるのでconfigファイルとenvファイルの両方が必要になります。
話が長くなりましたが次はメール送信ができるMailableの導入です。
Mailableを導入する手順
mailable(メイラブル)を使ってお問い合わせフォームを送信した時に自動メールの返信を行います。
メールの返信の流れは以下になります。
- コントローラーでメールの送信処理をしてメール送信はMailableに渡す。
- 新規Mailableクラスを作成して送信メールを設定する。その際に送信メールの内容はビューファイルを使う。
- ビューファイルに送信メールの内容を記述する。
1→2→3の順にコードを見ていきます。
1 : コントローラーの送信処理
既に記述したContactコントローラーを↓にします。
<?php

namespace App\Http\Controllers;

use Illuminate\Http\Request;
use App\Models\Contact;


//ここから追加
use Illuminate\Support\Facades\Mail;
use App\Mail\ContactForm;
//ここまで追加


class ContactController extends Controller
{
    public function create()
    {
        return view('contact.create');
    }

    public function store(Request $request)
    {
        $inputs = request()->validate([
            'title' => 'required|max:255',
            'email' => 'required|max:255',
            'body' => 'required'
        ]);
        Contact::create($inputs);


        //ここから追加
        Mail::to(config('mail.admin'))->send(new ContactForm($inputs));
        Mail::to($inputs['email'])->send(new ContactForm($inputs));
        //ここまで追加


        return back()->with('message','メールを送信したのでご確認ください');
    }
}
10行目・11行目を説明する前に33行目・34行目の説明をします。
33行目・34行目共に「Mail::to」がありますがこれは「Mailファサードのtoメソッドを使う」という意味です。
ファサードはざっくりした説明として便利な機能を簡単に使う事ができる物という感じです。
もう少しちゃんと説明するとサービスコンテナを簡単に使う事ができる物です。
サービスコンテナはこの記事に分かりやすい解説があります。
Mailファサードを使う為に10行目があります。
11行目はMailableを使える様にする為にあります。
33行目・34行目の説明に戻りますが33行目からです。
33行目は「Mail::to(config(‘mail.admin’))->send(new ContactForm($inputs));」ですが
「Mail::to(config(‘mail.admin’))」は「Laravelのプロジェクト > config > mail.php」の中のadminのMAIL_ADMINにメールを送信するという意味です。
'from' => [
        'address' => env('MAIL_FROM_ADDRESS', 'hello@example.com'),
        'name' => env('MAIL_FROM_NAME', 'Example'),
],
'admin'=>env('MAIL_ADMIN', null), //この行のadmin「send(new ContactForm($inputs))」は「ContactForm(あとで作ります)に処理を渡す」という意味です。
次は34行目です。
「Mail::to($inputs[‘email’])->send(new ContactForm($inputs));」ですが「Mail::to($inputs[‘email’])」は「お問い合わせフォームで入力したメールに送信する」という意味です。
2 : Mailableクラスの作成
Mailableクラスを作成しますがクラス名をContactForm(あとで説明しますと言ったやつです)とします。
下記のコマンドを叩きます。
php artisan make:mail ContactFormすると「Laravelのプロジェクト > app > Mail > ContactForm.php」 が作成されるのでコードを下記に編集します。(バージョン8の場合)
<?php

namespace App\Mail;

use Illuminate\Bus\Queueable;
use Illuminate\Contracts\Queue\ShouldQueue;
use Illuminate\Mail\Mailable;
use Illuminate\Queue\SerializesModels;

class ContactForm extends Mailable
{
    use Queueable, SerializesModels;

    /**
     * Create a new message instance.
     *
     * @return void
     */
    public function __construct($inputs)
    {
        $this->inputs = $inputs;                      //この行を編集
    }

    /**
     * Build the message.
     *
     * @return $this
     */
    public function build()
    {
        return $this->view('contact.mail')->with(['inputs' => $this->inputs])->subject('お問合せを受け付けました');      //この行を編集
    }
}
21行目・31行目を編集しています。
21行目の「$inputs」ですがフォームに入力した内容でContactコントローラーのstoreアクションに記述しています。
public function store(Request $request)
{
    $inputs = request()->validate([          //←ここ
        'title' => 'required|max:255',
        'email' => 'required|max:255',
        'body' => 'required'
    ]);
    Contact::create($inputs);

    Mail::to(config('mail.admin'))->send(new ContactForm($inputs));
    Mail::to($inputs['email'])->send(new ContactForm($inputs));

    return back()->with('message','メールを送信したのでご確認ください');
}31行目の「return $this->view(‘contact.mail’)->with([‘inputs’ => $this->inputs])」の意味は「メールを送信する際にLaravelのプロジェクト > resources > views > contact > mail.blade.php(あとで作成します)を使ってメール文面を作成しますがその際にinputsを利用する」という事です。
「->subject(‘お問合せを受け付けました‘)」はメールの件名を「お問合せを受け付けました」に設定しています。
バージョン10の場合は下記にします。
<?php

namespace App\Mail;

use Illuminate\Bus\Queueable;
use Illuminate\Contracts\Queue\ShouldQueue;
use Illuminate\Mail\Mailable;
use Illuminate\Mail\Mailables\Content;
use Illuminate\Mail\Mailables\Envelope;
use Illuminate\Queue\SerializesModels;

class ContactForm extends Mailable
{
    use Queueable, SerializesModels;

    /**
     * Create a new message instance.
     */
    public function __construct($inputs)
    {
        $this->inputs = $inputs;
    }

    /**
     * Get the message envelope.
     */
    public function envelope(): Envelope
    {
        return new Envelope(
            subject: 'Contact Form',
        );
    }

    //ここから削除
    /**
     * Get the message content definition.
     */
    public function content(): Content
    {
         return new Content(
             view: 'view.name',
         );
    }
    //ここまで削除

    /**
     * Get the attachments for the message.
     *
     * @return array<int, \Illuminate\Mail\Mailables\Attachment>
     */
    public function attachments(): array
    {
        return [];
    }


    //ここから追加
    public function build()
    {
        return $this->view('contact.mail')->with(['inputs' => $this->inputs])->subject('お問合せを受け付けました');
    }
    //ここまで追加


}
3 : 送信メールの内容を記述
「Laravelのプロジェクト > resoureces > views > contact > mail.blade.php」を作成して中身を↓にします。
<!DOCTYPE html>
<html lang="ja">
<head>
    <meta charset="UTF-8">
    <meta name="viewport" content="width=device-width, initial-scale=1.0">
    <meta http-equiv="X-UA-Compatible" content="ie=edge">
    <title>お問い合わせを受け付けました</title>
</head>
<body>
    <p>お問い合わせ内容は次のとおりです。</p>
    ーーーー
    <p>件名:{{$inputs['title']}}</p>
    <p>お問い合わせ内容:{{$inputs['body']}}</p>
    <p>メールアドレス:{{$inputs['email']}}</p>
    ーーーー
    <p>担当者よりご連絡いたしますので、今しばらくお待ちください。</p>
</body>
</html>12行目の「$inputs[‘title’]」・13行目の「$inputs[‘body‘]」・14行目の「$inputs[‘email]」はお問い合わせフォームに入力した内容です。
これでお問い合わせフォーム(http://localhost/contact/create)からお問合せフォームの内容を送信すると返信メールが管理者とお問合せをした人に来ます。
これでお問合せフォームの完成です。

