初心者用CakePHPでブログサイト②テーブルの情報をビューに表示して詳細に入る

1280 回閲覧されました
みなさんこんにちは、jonioです。
今回はマイグレーションファイルを使ってテーブルを作成してSeederを使ってテーブルにデータの挿入をしてモデルを使ってテーブルのデータを取得してそれをビューに表示して詳細を見ることができるようにします。
1回目の記事をまだ読んでない方は下記の記事から読んで下さい。

目次
テーブルの作成
まずはテーブルを作成しますがマイグレーションファイルを使います。
マイグレーションファイルを作成するコマンドは下記になります。
bin/cake bake migration Create名称「名称」の部分はPostsコントローラーで考えているとして「Posts」にします。
だからコマンドは下記になります。
bin/cake bake migration CreatePosts作成されたマイグレーションファイルは「CakePHPのプロジェクト > config > Migrations」の下の階層にあります。
デフォルトは下記になっています。
<?php
declare(strict_types=1);

use Migrations\AbstractMigration;

class CreatePosts extends AbstractMigration
{
    /**
     * Change Method.
     *
     * More information on this method is available here:
     * https://book.cakephp.org/phinx/0/en/migrations.html#the-change-method
     * @return void
     */
    public function change(): void
    {
        $table = $this->table('posts');
        $table->create();
    }
}
テーブルに使うカラムを作成する為の記述をしますが以下のカラム名と役割にします。(左の項目がカラム名です)
- title : ブログのタイトル
- description : 記事の詳しい説明
- body : 記事の内容
- published : 記事を公開しているか
- created : 記事の公開日
- modified : 記事の編集日
createdカラムとmodifiedカラムは作成するのがCakePHPの規約になっています。
マイグレーションファイルに下記の記述をします。
<?php
declare(strict_types=1);

use Migrations\AbstractMigration;

class CreatePosts extends AbstractMigration
{
    /**
     * Change Method.
     *
     * More information on this method is available here:
     * https://book.cakephp.org/phinx/0/en/migrations.html#the-change-method
     * @return void
     */
    public function change(): void
    {
      $table = $this->table('posts');


      //ここから追加
      $table->addColumn('title', 'string', [
          'limit' => 150,
          'null' => false
      ])
      ->addColumn('description', 'text', [
          'limit' => 255,
      ])
      ->addColumn('body', 'text')
      ->addColumn('published', 'boolean', [
          'default' => false
      ])
      ->addColumn('created', 'datetime')
      ->addColumn('modified', 'datetime')
      //ここまで追加


      ->create();
    }
}
カラムを設定する時は「addColumn」を使います。
引数の1つ目はカラム名で2つ目はデータ型で3つ目はオプションです。
22行目の「limit」は何文字まで使えるかです。
23行目の「null」は空っぽでもいいかで、falseにした場合は必須になります。
30行目の「default」はデフォルトの値の設定です。
記述が終わったら下記のコマンドを叩きます。
bin/cake migrations migrateこれでテーブルができました。
テーブルにデータの挿入
今の状態はカラムに値が入ってないのでSeederでデータを入れます。
下記のコマンドを叩きます。
bin/cake bake seed テーブル名今回はテーブル名を「Posts」とします。
よって下記のコマンドを叩きます。
bin/cake bake seed Posts成功すると「CakePHPのプロジェクト > config > Seeds」の下の階層にSeederファイル(PostsSeed.php)が作成されます。
ファイルを開くと下記になっています。
<?php
declare(strict_types=1);

use Migrations\AbstractSeed;

/**
 * Posts seed.
 */
class PostsSeed extends AbstractSeed
{
    /**
     * Run Method.
     *
     * Write your database seeder using this method.
     *
     * More information on writing seeds is available here:
     * https://book.cakephp.org/phinx/0/en/seeding.html
     *
     * @return void
     */
    public function run(): void
    {
        $data = [];

        $table = $this->table('posts');
        $table->insert($data)->save();
    }
}
23行目の「data」の項目に記述します。
<?php
declare(strict_types=1);

use Migrations\AbstractSeed;

/**
 * Posts seed.
 */
class PostsSeed extends AbstractSeed
{
    /**
     * Run Method.
     *
     * Write your database seeder using this method.
     *
     * More information on writing seeds is available here:
     * https://book.cakephp.org/phinx/0/en/seeding.html
     *
     * @return void
     */
    public function run(): void
    {
        $data = [


            //ここから追加
            [
                'title' => '最初の投稿',
                'description' => '最初の投稿の概要',
                'body' => '最初の投稿の内容',
                'published' => 1,
                'created' => '2020-05-02 10:00:00',
                'modified' => '2020-05-02 10:00:00',
            ],
            [
                'title' => '2番目の投稿',
                'description' => '2番目の投稿の概要',
                'body' => '2番目の投稿の内容',
                'published' => 1,
                'created' => '2020-05-02 10:00:00',
                'modified' => '2020-05-02 10:00:00',
            ],
            //ここまで追加


        ];

        $table = $this->table('posts');
        $table->insert($data)->save();
    }
}
追加するデータは連想配列で書きます。
keyはカラム名でvalueはデータです。
記述が終わったら下記のコマンドを叩きます。
bin/cake migrations seedこれでテーブルにデータが入りましたが確認をします。
データが入っているかの確認
下記のコマンドを叩いてSqliteにアクセスします。
sqlite3 database/product.sqliteSqliteにアクセスしたら下記のコマンドを叩いてテーブルの中身を確認します。
SELECT * FROM posts;すると下記の表示になります。
1|最初の投稿|最初の投稿の概要|最初の投稿の内容|1|2020-05-02 10:00:00|2020-05-02 10:00:00
2|2番目の投稿|2番目の投稿の概要|2番目の投稿の内容|1|2020-05-02 10:00:00|2020-05-02 10:00:00
これでpostsテーブルにSeederでデータが入ったのを確認できました。
それではpostsテーブルのデータをビューに表示しますがまずはモデルを作成します。
モデルの作成
モデルを作成する為のコマンドは下記になります。
bin/cake bake model モデル名テーブル名がpostsだったのでモデル名もPostsにします、下記のコマンドを叩きます。
bin/cake bake model Posts成功すると「CakePHPのプロジェクト > src > Model > Entity > Post.php」と「CakePHPのプロジェクト > src > Model > Table > PostsTable.php」が作成されたのを確認できますがPost.phpとPostsTable.phpで役割が違います。
Post.phpとPostsTable.phpの役割
Post.phpから見ていきます。
Post.phpの中身は下記になっています。
<?php
declare(strict_types=1);

namespace App\Model\Entity;

use Cake\ORM\Entity;

/**
 * Post Entity
 *
 * @property int $id
 * @property string $title
 * @property string $description
 * @property string $body
 * @property bool $published
 * @property \Cake\I18n\FrozenTime $created
 * @property \Cake\I18n\FrozenTime $modified
 */
class Post extends Entity
{
    /**
     * Fields that can be mass assigned using newEntity() or patchEntity().
     *
     * Note that when '*' is set to true, this allows all unspecified fields to
     * be mass assigned. For security purposes, it is advised to set '*' to false
     * (or remove it), and explicitly make individual fields accessible as needed.
     *
     * @var array<string, bool>
     */
    protected $_accessible = [
        'title' => true,
        'description' => true,
        'body' => true,
        'published' => true,
        'created' => true,
        'modified' => true,
    ];
}
30行目〜37行目は更新ができるかを設定しています。
連想配列で書いてkeyはカラム名でvalueは可能か不可能かを書きます、可能の時は「true」で不可能の時は「false」です。
次はPostsTable.phpです。
PostsTable.phpの中身は下記になっています。
<?php
declare(strict_types=1);

namespace App\Model\Table;

use Cake\ORM\Query;
use Cake\ORM\RulesChecker;
use Cake\ORM\Table;
use Cake\Validation\Validator;

/**
 * Posts Model
 *
 * @method \App\Model\Entity\Post newEmptyEntity()
 * @method \App\Model\Entity\Post newEntity(array $data, array $options = [])
 * @method \App\Model\Entity\Post[] newEntities(array $data, array $options = [])
 * @method \App\Model\Entity\Post get($primaryKey, $options = [])
 * @method \App\Model\Entity\Post findOrCreate($search, ?callable $callback = null, $options = [])
 * @method \App\Model\Entity\Post patchEntity(\Cake\Datasource\EntityInterface $entity, array $data, array $options = [])
 * @method \App\Model\Entity\Post[] patchEntities(iterable $entities, array $data, array $options = [])
 * @method \App\Model\Entity\Post|false save(\Cake\Datasource\EntityInterface $entity, $options = [])
 * @method \App\Model\Entity\Post saveOrFail(\Cake\Datasource\EntityInterface $entity, $options = [])
 * @method \App\Model\Entity\Post[]|\Cake\Datasource\ResultSetInterface|false saveMany(iterable $entities, $options = [])
 * @method \App\Model\Entity\Post[]|\Cake\Datasource\ResultSetInterface saveManyOrFail(iterable $entities, $options = [])
 * @method \App\Model\Entity\Post[]|\Cake\Datasource\ResultSetInterface|false deleteMany(iterable $entities, $options = [])
 * @method \App\Model\Entity\Post[]|\Cake\Datasource\ResultSetInterface deleteManyOrFail(iterable $entities, $options = [])
 *
 * @mixin \Cake\ORM\Behavior\TimestampBehavior
 */
class PostsTable extends Table
{
    /**
     * Initialize method
     *
     * @param array $config The configuration for the Table.
     * @return void
     */
    public function initialize(array $config): void
    {
        parent::initialize($config);

        $this->setTable('posts');
        $this->setDisplayField('title');
        $this->setPrimaryKey('id');

        $this->addBehavior('Timestamp');
    }

    /**
     * Default validation rules.
     *
     * @param \Cake\Validation\Validator $validator Validator instance.
     * @return \Cake\Validation\Validator
     */
    public function validationDefault(Validator $validator): Validator
    {
        $validator
            ->scalar('title')
            ->maxLength('title', 150)
            ->requirePresence('title', 'create')
            ->notEmptyString('title');

        $validator
            ->scalar('description')
            ->requirePresence('description', 'create')
            ->notEmptyString('description');

        $validator
            ->scalar('body')
            ->requirePresence('body', 'create')
            ->notEmptyString('body');

        $validator
            ->boolean('published')
            ->notEmptyString('published');

        return $validator;
    }
}
38行目のinitializeメソッドはどのテーブルを使うか・主キーの設定をします。
55行目のvalidationDefaultメソッドはバリデーションを行っています。
61行目の「notEmptyString」は必須という意味ですが必須でなくてもいい場合は「allowEmptyString」にします。
今回はPostsTable.phpのvalidationDefaultメソッドを下記に変更します。
public function validationDefault(Validator $validator): Validator
{
  $validator
      ->scalar('title')
      ->maxLength('title', 150)
      ->requirePresence('title', 'create')
      ->notEmptyString('title');

  $validator
      ->scalar('description')
      ->requirePresence('description', 'create')
      ->allowEmptyString('description');              //「allowEmptyString」に変更

  $validator
      ->scalar('body')
      ->requirePresence('body', 'create')
      ->allowEmptyString('body');                     //「allowEmptyString」に変更

  $validator
      ->boolean('published')
      >notEmptyString('published');

  return $validator;
}
それではモデルからデータを取得します。
コントローラーでモデルからデータを取得する
まずはPostモデルにアクセスしてテーブルのデータを取得します。
Postsコントローラーのindexメソッドを下記にします。
public function index()
{
  $posts = $this->Posts->find('all');
}
3行目の「$this->Posts」でモデルにアクセスして「->find(‘all’)」でpostsテーブルの全てのデータを取得しています。
コントローラーからビューに変数「$posts」を渡す為にindexメソッドに追記します。
public function index()
{
  $posts = $this->Posts->find('all');

  $this->set(compact('posts'));           //この行を追加
}
それではテーブルのデータをビューで表示します。
テーブルのデータをビューに表示
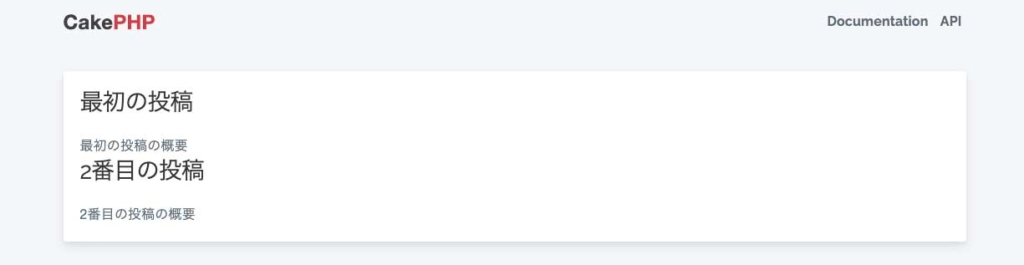
記事のタイトルと説明を表示する為にPostsフォルダの中のindex.phpを下記に変更します。
<div class="content">
    <?php foreach ($posts as $post):?>
        <h3><?= $post->title ?></h3>
        <p><?= $post->description ?></p>
    <?php endforeach?>
</div>
3行目の「title」・4行目の「description」はpostsテーブルのカラム名です。
これで「http://localhost:8888/cakephp/CakeBlog1/posts/index」にアクセスすると下記の表示になります。
次は記事の詳細を表示しますがコントローラーからパラメーターを渡します。
記事の詳細を表示
Postsコントローラーのviewメソッドを下記に変更します。
public function view($id = null)
{

  $post = $this->Posts->get($id);

  $this->set(compact('post'));
}
1つの情報を取得する時は4行目の「->get()」を使います、引数の「$id」はpostsテーブルの主キーのことで「$id」を記述するとブログの詳細ページを見ることができます。
主キーが何かを確認するにはさっき見たPostsTable.phpに記載があるのでそれを見ればいいです。
public function initialize(array $config): void
{
parent::initialize($config);
$this->setTable('posts');
$this->setDisplayField('title');
$this->setPrimaryKey('id'); //この行が主キー
$this->addBehavior('Timestamp');
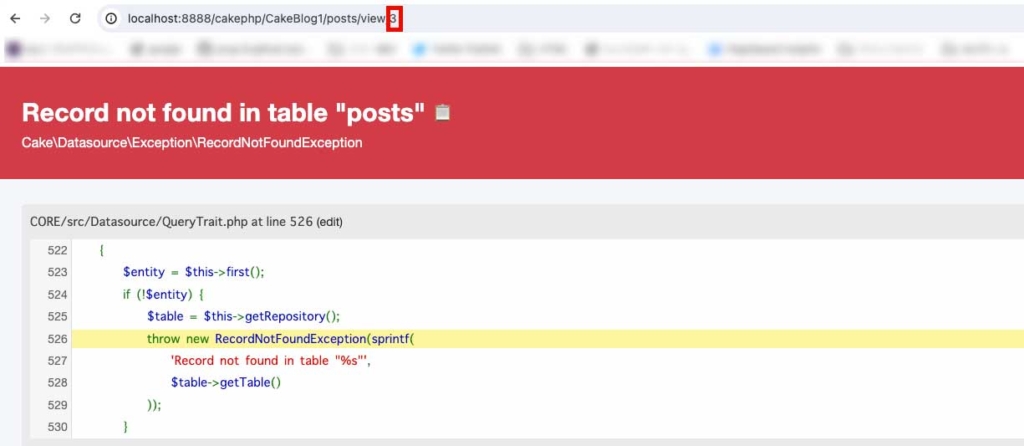
}「$id」はidカラムですがpostsテーブルの中を確認した時下記になっていました。
1|最初の投稿|最初の投稿の概要|最初の投稿の内容|1|2020-05-02 10:00:00|2020-05-02 10:00:00
2|2番目の投稿|2番目の投稿の概要|2番目の投稿の内容|1|2020-05-02 10:00:00|2020-05-02 10:00:001行目と2行目の一番左がidカラムですが1と2しかないのでviewメソッドで表示するページにアクセスする時に「http://localhost:8888/cakephp/CakeBlog1/posts/view/数字」の「数字」に1・2以外を使うとエラーになります。
例えば数字の部分に3を使うと下記のエラーが出ます。
それではページの確認をします。
view.phpを下記に変更して下さい。
<h1><?= $post->title ?></h1>
<p><?= $post->body ?></p>そして数字を1にすると表示が下記になります。

同様に数字を2にしても表示されますので確認して下さい。
テーブルの絞り込みをしてビューに表示する内容を変える
例えばトップページにヒップアップで表示したい記事があったとします。

こんな時はテーブルのカラムを新しく作ってデータの値を0や1などで設定してコントローラーでカラムの値が0のデータを取得してビューでそれを表示すれば実装できます。
だからコントローラーで取得するデータの絞り込みをします。
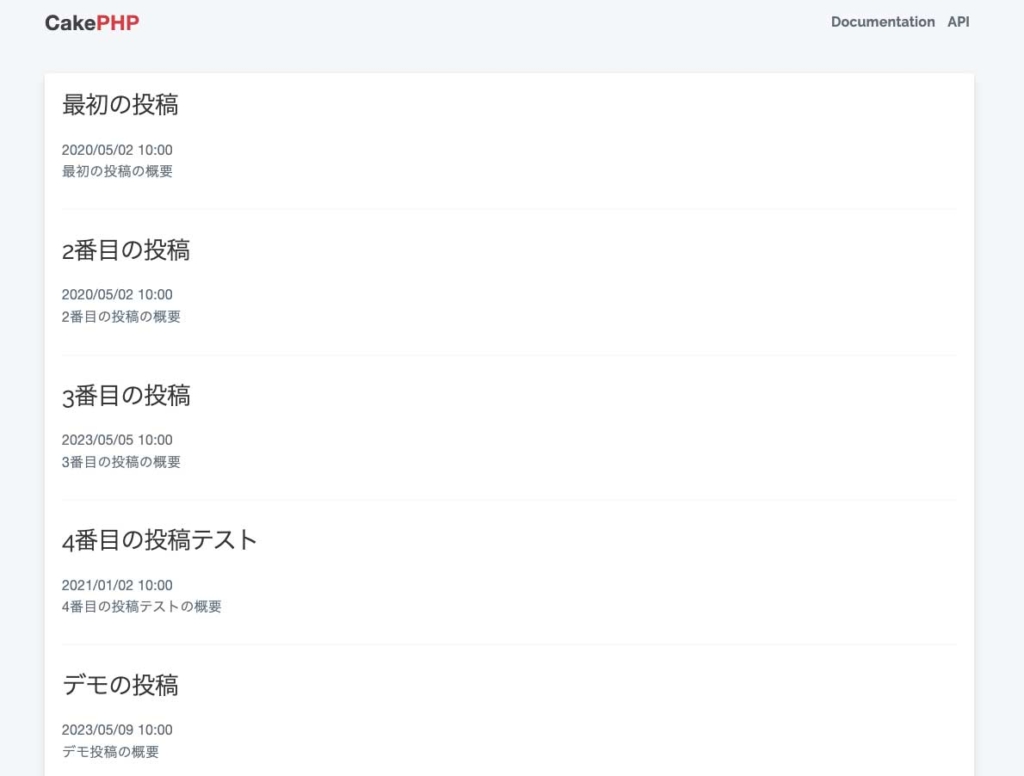
テーブルのデータを追加する
postsテーブルにSeederを使ってデータの挿入をしましたが一旦リセットする為に下記のコマンドを叩きます。
bin/cake migrations rollbackそしてPostsSeed.phpを下記に変更します。
<?php
declare(strict_types=1);

use Migrations\AbstractSeed;

/**
 * Posts seed.
 */
class PostsSeed extends AbstractSeed
{
    /**
     * Run Method.
     *
     * Write your database seeder using this method.
     *
     * More information on writing seeds is available here:
     * https://book.cakephp.org/phinx/0/en/seeding.html
     *
     * @return void
     */
    public function run(): void
    {
        $data = [
            [
                'title' => '最初の投稿',
                'description' => '最初の投稿の概要',
                'body' => '最初の投稿の内容',
                'published' => 1,
                'created' => '2020-05-02 10:00:00',
                'modified' => '2020-05-02 10:00:00',
            ],
            [
                'title' => '2番目の投稿',
                'description' => '2番目の投稿の概要',
                'body' => '2番目の投稿の内容',
                'published' => 1,
                'created' => '2020-05-02 10:00:00',
                'modified' => '2020-05-02 10:00:00',
            ],


            //ここから追加
            [
                'title' => '3番目の投稿',
                'description' => '3番目の投稿の概要',
                'body' => '3番目の投稿の内容',
                'published' => 1,
                'created' => '2023-05-05 10:00:00',
                'modified' => '2023-05-05 10:00:00',
            ],
            [
                'title' => '4番目の投稿テスト',
                'description' => '4番目の投稿テストの概要',
                'body' => '4番目の投稿の内容',
                'published' => 1,
                'created' => '2021-01-02 10:00:00',
                'modified' => '2021-01-02 10:00:00',
            ],
            [
                'title' => 'デモの投稿',
                'description' => 'デモ投稿の概要',
                'body' => '5番目の投稿の内容',
                'published' => 0,
                'created' => '2023-05-09 10:00:00',
                'modified' => '2023-05-09 10:00:00',
            ],
            //ここまで追加


        ];

        $table = $this->table('posts');
        $table->insert($data)->save();
    }
}
そして下記のコマンドを叩きます。
bin/cake migrations migrateそして下記のコマンドを叩きます。
bin/cake migrations seed これで「http://localhost:8888/cakephp/CakeBlog1/posts/index」にアクセスすると下記の表示になります。
それでは「http://localhost:8888/cakephp/CakeBlog1/posts/index」にアクセスした時に表示するデータの絞り込みを行いますがクエリビルダーを使います。
titleカラムの値が一致したデータを絞り込み
Postsコントローラーのindexメソッドを下記にします。
public function index()
{
  $posts = $this->Posts->find('all')->where(['title' => '2番目の投稿']);

  $this->set(compact('posts'));
}
データの絞り込みは3行目の「->where([‘title’ => ‘2番目の投稿’])」で行いますが連想配列で書きます。
keyにカラム名を書きvalueに絞り込みに使う内容を書きます。
titleカラムが「2番目の投稿」のデータのみを絞り込みます。
タイトルカラムに含むデータを絞り込み
さっきはtitleカラムのデータに一致しないといけませんでしたが今回はデータに文言が含まれていればいい時を考えます。
indexメソッドを下記にします。
public function index()
{
  $posts = $this->Posts->find('all')->where(['title LIKE' => '%番目%']);

  $this->set(compact('posts'));
}
3行目のLIKEはSQLのLIKE句のことです。
valueには含んでほしい文言を%で囲みます、今だと「番目」を含むデータを取得します。
複数の条件で絞り込み
ここまでは1つの条件で絞り込みをしていますが2つ以上の条件で絞り込みをする場合は下記の書き方になります。
public function index()
{
  $posts = $this->Posts->find('all')->where([
    'title LIKE' => '%番目%',
    'published' => false
  ]);

  $this->set(compact('posts'));
}
3行目〜5行目ですが複数の条件での絞り込みをする時は配列の中に続けて書きます。
上記の例は条件が2つですがまだある場合は下に続けて書けばいいです。
この書き方は条件が増えるたびに配列に追加すればいいですが下記の書き方でもいいです。
public function index()
{
  $posts = $this->Posts->find('all')->where(['title LIKE' => '%番目%',])
                                    ->andwhere(['published' => false]);

  $this->set(compact('posts'));
}
同じ結果が得られますが「->andwhere()」で条件を増やせばいいです。
日付で絞り込み
2020年5月1日より後の日付のデータを取得する時は下記の書き方をします。
public function index()
{
  $posts = $this->Posts->find('all')->where(['created >' => '2020-05-01',]);

  $this->set(compact('posts'));
}
日付の書き方が「2020-05-01」なのはテーブルのデータがこの形だからです。
2020年5月1日より前の日付のデータを取得する時は下記になります。
public function index()
{
  $posts = $this->Posts->find('all')->where(['created <' => '2020-05-01',]);

  $this->set(compact('posts'));
}
日付が一致するデータを取得する場合は下記の書き方になります。
public function index()
{
  $posts = $this->Posts->find('all')->where(['DATE(created)' => '2020-05-02',]);

  $this->set(compact('posts'));
}
日付カラム名を「DATE」で囲めばいいです、DATEがないとデータの絞り込みができません。
ここまでは指定した日付よりも「あと・前・一致する」場合でしたが期間を指定したい場合もあります。
その場合は下記の書き方をします。
public function index()
{
  $posts = $this->Posts->find('all')->where(function($exp) {
             return $exp->between('created', '2020-01-03', '2023-01-03');
           });

  $this->set(compact('posts'));
}
where以降の書き方はbetweenの中以外そのままでいいです。
betweenの部分で4行目の1つ目の引数はカラム名で2つ目の引数は期間のスタートの日で3つ目の引数は期間の終了の日です。
取得するデータの数を制限
取得するデータの数を指定したい場合があります。
その場合のコードは下記になります。
public function index()
{
  $posts = $this->Posts->find('all')->limit(1);

  $this->set(compact('posts'));
}
3行目の「limit(数値)」でデータの数を指定できます、今は1つです。
なお取得するデータは日付が新しい順になります。
取得するデータの並び順を変える
デフォルトでは新しい順にデータを取得しますが古い順の取得もできます。
その場合のコードは下記になります。
public function index()
{
  $posts = $this->Posts->find('all')->order(['created' => 'desc']);

  $this->set(compact('posts'));
}
並び順の指定は3行目の「order」を使えばいいよく引数は連想配列を使います。
keyはカラム名でvalueは新しい順なら「desc」・古い順なら「asc」を書きます。
動的Finder
下記のコードは条件の絞り込みを配列にしています。
$posts = $this->Posts->find('all')->where(['published' => false]); 配列を使わない方法もあり動的Finderといいます。
下記の書き方になります。
$posts = $this->Posts->findByPublished(false);動的Finderの書き方は「findByカラム名」です、カラム名の最初の文字は大文字にします。
publishedカラムを考えていたので「findByPublished」としました。
引数は配列の時のvalueを書きます。
今は条件が1つですが複数にしたい時もあります。
その場合の書き方は下記になります。
$posts = $this->Posts->findByPublishedAndTitle(0, 'デモの投稿'); さっきは「findByPublished」でしたが「And」でつなげてカラム名の最初を大文字にして書けばいいです。
引数は「publishedカラムのvalueの値→titleカラムの値」の順に書けばいいです。
それでは詳細ページにアクセスできるようにしますがその前に少しだけ作り込みをします。
scriptタグの無効化(XSS対策)
PostsSeed.phpを下記に修正します。
[
'title' => '最初の投稿',
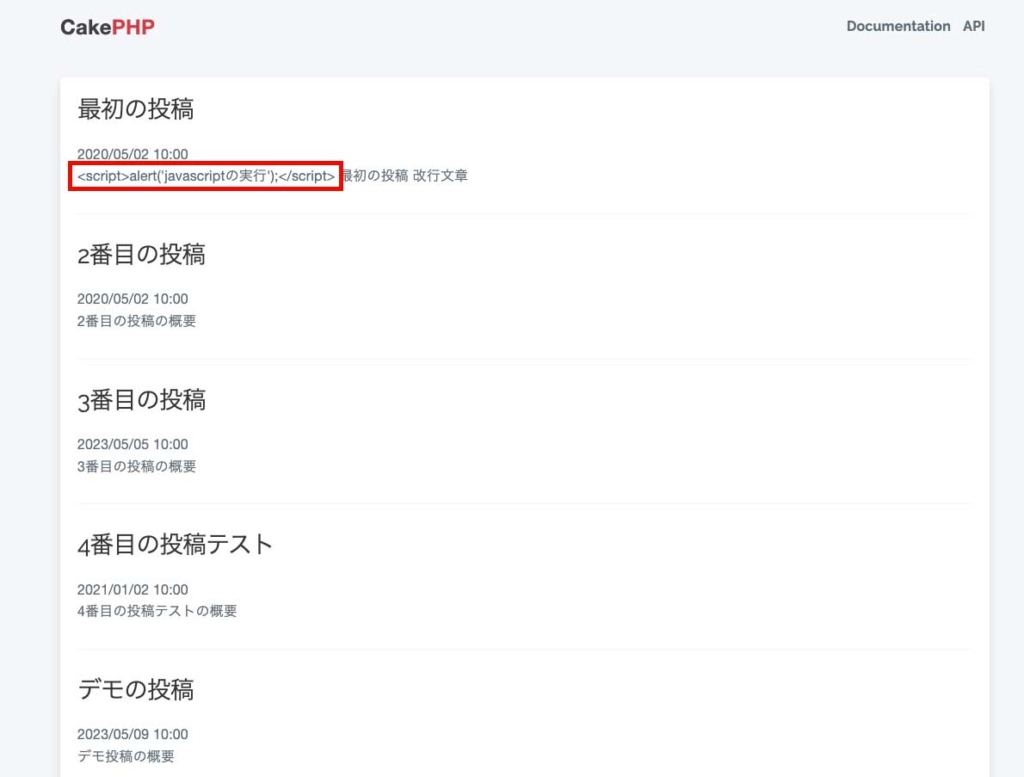
'description' => "<script>alert('javascriptの実行');</script>\n最初の投稿\n改行文章", //この行を修正
'body' => '最初の投稿の内容',
'published' => 1,
'created' => '2020-05-02 10:00:00',
'modified' => '2020-05-02 10:00:00',
],
//他は変更がないので省略これで「http://localhost:8888/cakephp/CakeBlog1/posts/index」にアクセスすると下記の表示になります。
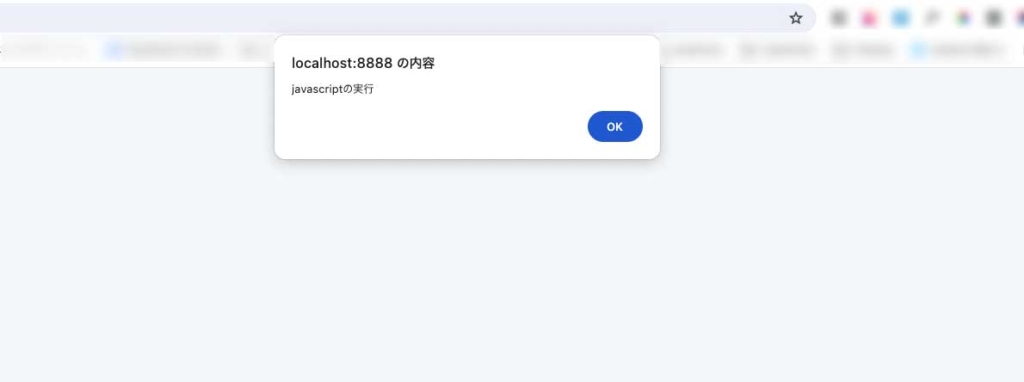
こうなるはカラムのデータにscriptタグが入っているのが原因です、XSS(クロスサイトスクリプティング)といいます。
不特定多数の人が投稿できるサイトだと悪意を持った人がわざとscriptタグが混ざったデータの登録をする可能性があります。
今回はモーダルが表示されるだけですが悪意がある場合は個人情報を抜き取ることもできます。
対策としてはscirptタグをただの文字列に変えればいいです。
その為にはビュー(index.php)を下記にすればいいです。
<div class="content">
    <?php foreach ($posts as $post):?>
        <h3><?= h($post->title) ?></h3>
        <p><?= $post->created ?></p>
        <p><?= h($post->description) ?></p>
        <hr>
    <?php endforeach?>
</div>
3行目と5行目を修正していますがscriptタグを無効化したい部分を「h()」の引数に入れればいいです。(titleカラムにscriptタグはないですが一応h()を書いておきます)
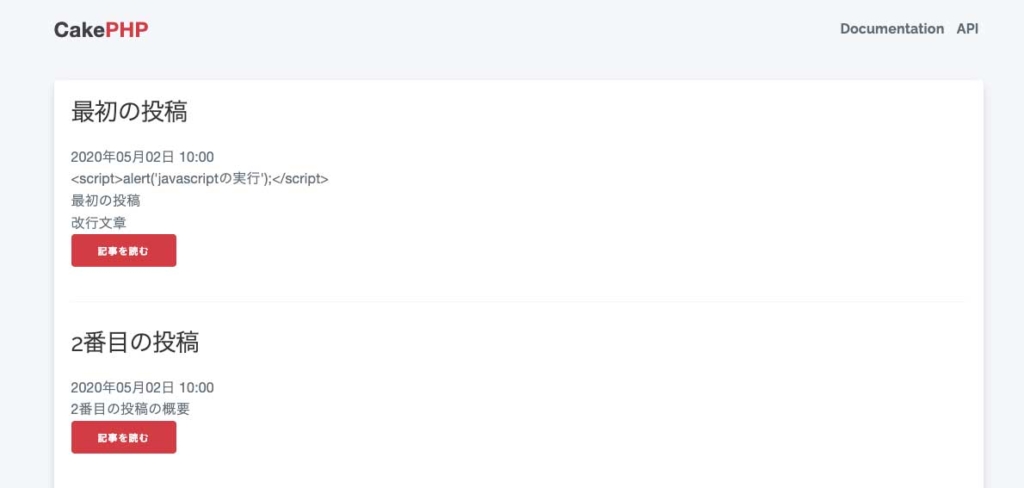
これでモーダルが表示されなくなって下記の表示に変わりscriptタグがただの文字列になっているのが確認できます。
改行が入るようにする
「PostsSeed.php」の3行目ですが改行(「\n」のこと)が入っています。
[
  'title' => '最初の投稿',
  'description' => "<script>alert('javascriptの実行');</script>\n最初の投稿\n改行文章",   //「\n」の部分
  'body' => '最初の投稿の内容',
  'published' => 1,
  'created' => '2020-05-02 10:00:00',
  'modified' => '2020-05-02 10:00:00',
],
今のままでは「最初の投稿」・「改行文章」は改行されていませんが改行する為にindex.phpのコードを下記に変更します。
<div class="content">
    <?php foreach ($posts as $post):?>
        <h3><?= h($post->title) ?></h3>
        <p><?= $post->created ?></p>
        <p><?= $this->Text->autoParagraph(h($post->description)) ?></p>      //この行を修正
        <hr>
    <?php endforeach?>
</div>
「$this->Text->autoParagraph())」の引数に「h($post->description)」を使えばいいです。
これで「http://localhost:8888/cakephp/CakeBlog1/posts/index」にアクセスすると改行の確認ができます。

日付の表示方法の変更(フォーマット)
下記の日付の表示を変えます。

index.phpを下記に変更します。
<div class="content">
    <?php foreach ($posts as $post):?>
        <h3><?= h($post->title) ?></h3>
        <p><?= $post->created->i18nFormat('YYYY年MM月dd日 HH:mm') ?></p>          //この行を修正
        <?= $this->Text->autoParagraph(h($post->description)) ?>
        <hr>
    <?php endforeach?>
</div>
これで日付の表示が下記に変わります。

5行目の「$this->Text->autoParagraph()」は自動的にpタグになるので元々付けていたpタグは削除しました。
それでは記事の詳細ページにアクセスできるようにします。
記事の詳細ページへのアクセス
index.phpのコードを下記に変更します。
<div class="content">
    <?php foreach ($posts as $post):?>
        <h3><?= h($post->title) ?></h3>
        <p><?= $post->created->i18nFormat('YYYY年MM月dd日 HH:mm') ?></p>
        <p><?= $this->Text->autoParagraph(h($post->description)) ?></p>
        <hr>
        <a class="button" href="/cakephp/CakeBlog1/posts/view/<?= $post->id ?>">記事を読む</a>  //この行を追加
    <?php endforeach?>
</div>
これで「http://localhost:8888/cakephp/CakeBlog1/posts/index」にアクセスすると下記の表示になります。
「記事を読む」をクリックすると記事の詳細ページへアクセスできますが上記のコードの7行目の「/cakephp/CakeBlog1/posts/view/」が直書きでプログラムっぽさがないです。
だから下記のコードに修正します。
<div class="content">
    <?php foreach ($posts as $post):?>
        <h3><?= h($post->title) ?></h3>
        <p><?= $post->created->i18nFormat('YYYY年MM月dd日 HH:mm') ?></p>
        <p><?= $this->Text->autoParagraph(h($post->description)) ?></p>
        <hr>
        <?= $this->Html->link('記事を読む', [
            'controller' => 'Posts',
            'action' => 'view',
            $post->id
        ],['class' => 'button']) ?>
    <?php endforeach?>
</div>
この書き方でも変更前と同じように記事の詳細に入ることができます。
元々あったaタグを7行目〜11行目に変更しています。
リンクにする時は「$this->Html->link()」と書けばいいです。
引数は下記の設定をすればいいです。
- 1つ目の引数 : aタグで使いたい文言
- 2つ目の引数の1つ目(’controller’ => ‘Posts’) : リンク先で使うコントローラー名
- 2つ目の引数の2つ目(’action’ => ‘view’) : リンク先で表示するビュー名
- 2つ目の引数の3つ目($post->id) : リンクに使うパラメーター
- 3つ目の引数 : cssのクラス名
今のままでは1つのページに全ての記事を表示しますが記事が大量にあるとページが長すぎてうっとうしくなります。
だから1つのページに表示する記事数を指定する為ページネーションを実装します。
ページネーション
Postsコントローラーに下記の記述をします。
//ここから上の行は変更がない為省略

class PostsController extends AppController
{


    //ここから追加
    public $paginate = [
        'limit' => 2,
        'order' => [
            'Posts.created' => 'desc'
        ]
    ];
    //ここまで追加


    public function initialize(): void{
        parent::initialize();
        $this->viewBuilder()->setLayout('test');
    }

    /**
     * Index method
     *
     * @return \Cake\Http\Response|null|void Renders view
     */
    public function index()
    {
        $posts = $this->paginate($this->Posts->find('all'));         //この行を修正

        $this->set(compact('posts'));
    }


//ここから下の行は変更がない為省略
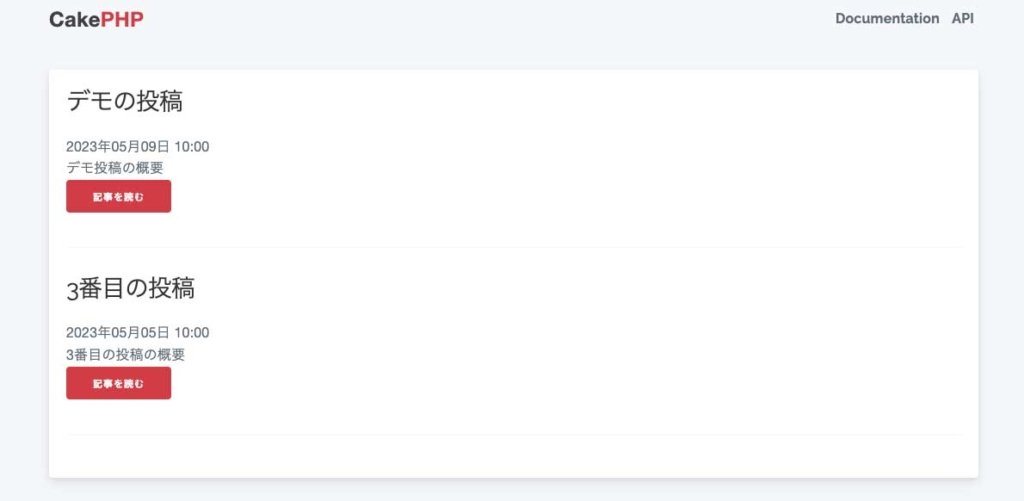
これで「http://localhost:8888/cakephp/CakeBlog1/posts/index」にアクセスすると下記の表示(記事は2件だけ)になります。
ページネーションを実装するにはまず9行目・14行目を書きます。
10行目の「limit」は1ページで表示する記事の数です、今回は2にしているので2件表示されます。
11行目の「order」は記事の並び順です、新しい順か古い順に並べますがそれを12行目に書きます。
12行目の「Posts.created」は「モデル名s.created」です、今回の解説みたいに使用するモデルが1つの場合は「モデル名s」は書かなくていいです。
そして記事を表示するindexメソッドで「$this->paginate()」の引数に「$this->Posts->find(‘all’)」を入れます。
これでコントローラーでのページネーションの設定はできたので次はビュー(index.php)に記述します。
<div class="content">
    <?php foreach ($posts as $post):?>
        <h3><?= h($post->title) ?></h3>
        <p><?= $post->created->i18nFormat('YYYY年MM月dd日 HH:mm') ?></p>
        <p><?= $this->Text->autoParagraph(h($post->description)) ?></p>
        <hr>
        <?= $this->Html->link('記事を読む', [
            'controller' => 'Posts',
            'action' => 'view',
            $post->id
        ],['class' => 'button']) ?>
    <?php endforeach?>


    //ここから追加
    <?php if($this->Paginator->total() > 1):?>
        <div class="paginator">
            <ul class="pagination">
                <?= $this->Paginator->first('<< 最初') ?>
                <?= $this->Paginator->prev('< 前へ') ?>
                <?= $this->Paginator->numbers() ?>
                <?= $this->Paginator->next('次へ >') ?>
                <?= $this->Paginator->last('最後 >>') ?>
            </ul>
        </div>
    <?php endif ?>
    //ここまで追加


</div>
これで「http://localhost:8888/cakephp/CakeBlog1/posts/index」にアクセスすると下記の表示になりページネーションが表示されるのが確認できます。

16行目のif文の条件式は「表示するページ数が1より大きい(2ページ以上ある)場合は」という意味です。
21行目はページ番号(上記画像の「1」・「2」・「3」のこと)を表示しています。
これでページネーションの実装が完成しました。
次回の解説
次回の解説は管理画面・CRUD機能・ログイン機能の作成です。